

Disclaimer: I work for n8n. This post has not been sponsored or approved by n8n, but you should still be aware of this when reading my thoughts on the topic.
Intro
The other day, I came across a discussion in the Heartcore HR community (yes, I have a very exciting life). It started with people discussing how to use HiBob's new AI tools in their developer documentation, but it quickly shifted towards general concerns about connecting HRIS tools with AI, with other users asking questions such as "How do you answer questions like 'Who is XX’s manager?'".
Answering such straightforward questions has become a relatively trivial challenge with modern LLMs, provided they have access to the relevant knowledge. However, even in organisations with a dedicated engineering team for internal tooling, such projects are usually not prioritised due to the legal challenges involved in connecting confidential data with easily accessible AI models. One community member pointed out that she is currently dealing with four different regulations relevant to her organisation.
While HR teams are usually capable of navigating the legal challenges, they often lack the resources to develop a solution independently and from scratch.
I believe that using a modern HRIS such as HiBob, with its comprehensive API and upcoming MCP server, combined with an AI-native workflow automation tool such as n8n, is one of the best solutions we have to this problem as of today.
In this post, I want to explain how easy it is to answer questions such as 'Who is XX’s manager?' using AI, with n8n acting as the link between HiBob and the API. We will use Slack as our UI here since everyone in our organisation is familiar with it. Building a chat widget or using any other tool is equally simple, but is not covered by this guide. However, if you are interested in implementing this, I highly recommend checking out the n8n documentation and its course, as it will empower you to integrate with virtually any system!
Prerequisites
You will need the following to follow this guide/implement a similar solution on your side:
- An API service user for HiBob with access to the relevant information (HiBob documentation)
- API access to an AI model (we'll use the OpenAI API in this guide, but virtually all modern AI models will work as long as they're powerful enough to work with tools)
- Access to Slack with the permission to install new Slack apps
- Access to n8n (any version will work, even the free self-hosted version)
Ideally you also have a general understanding of concepts like APIs and AI, but this isn't strictly required. If you already know how to use n8n skip to the very bottom to simply download the finished workflow.
Setup
Slack app
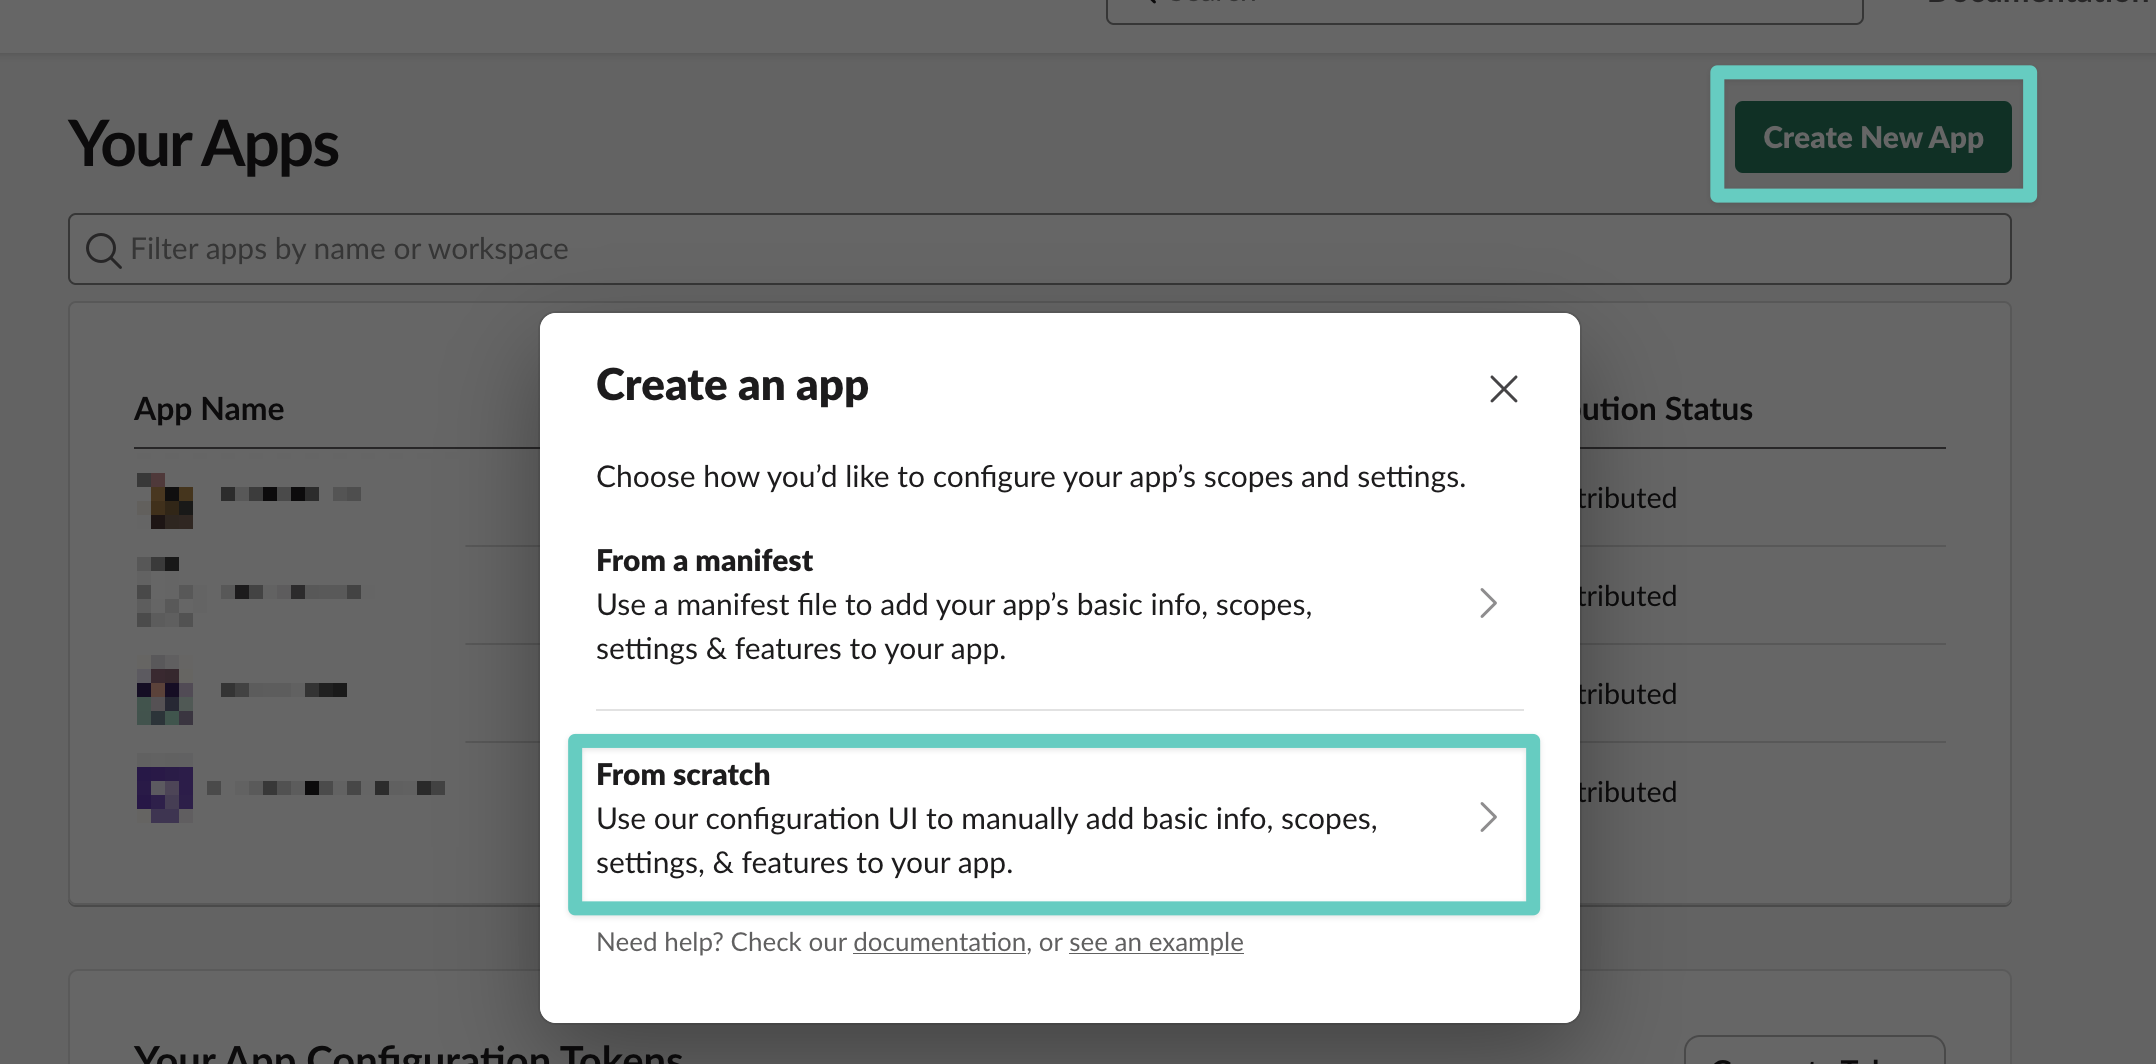
- Navigate to https://api.slack.com/apps/ and click on Create New App (if you have created a Slack app before you can also re-use the existing app)
- Select From scratch when asked how to create the app
- Enter an App Name of your choice
- Pick the Slack workspace to use
- Confirm everything with Create App
- In the left sidebar, navigate to OAuth & Permissions and scroll down to Scopes
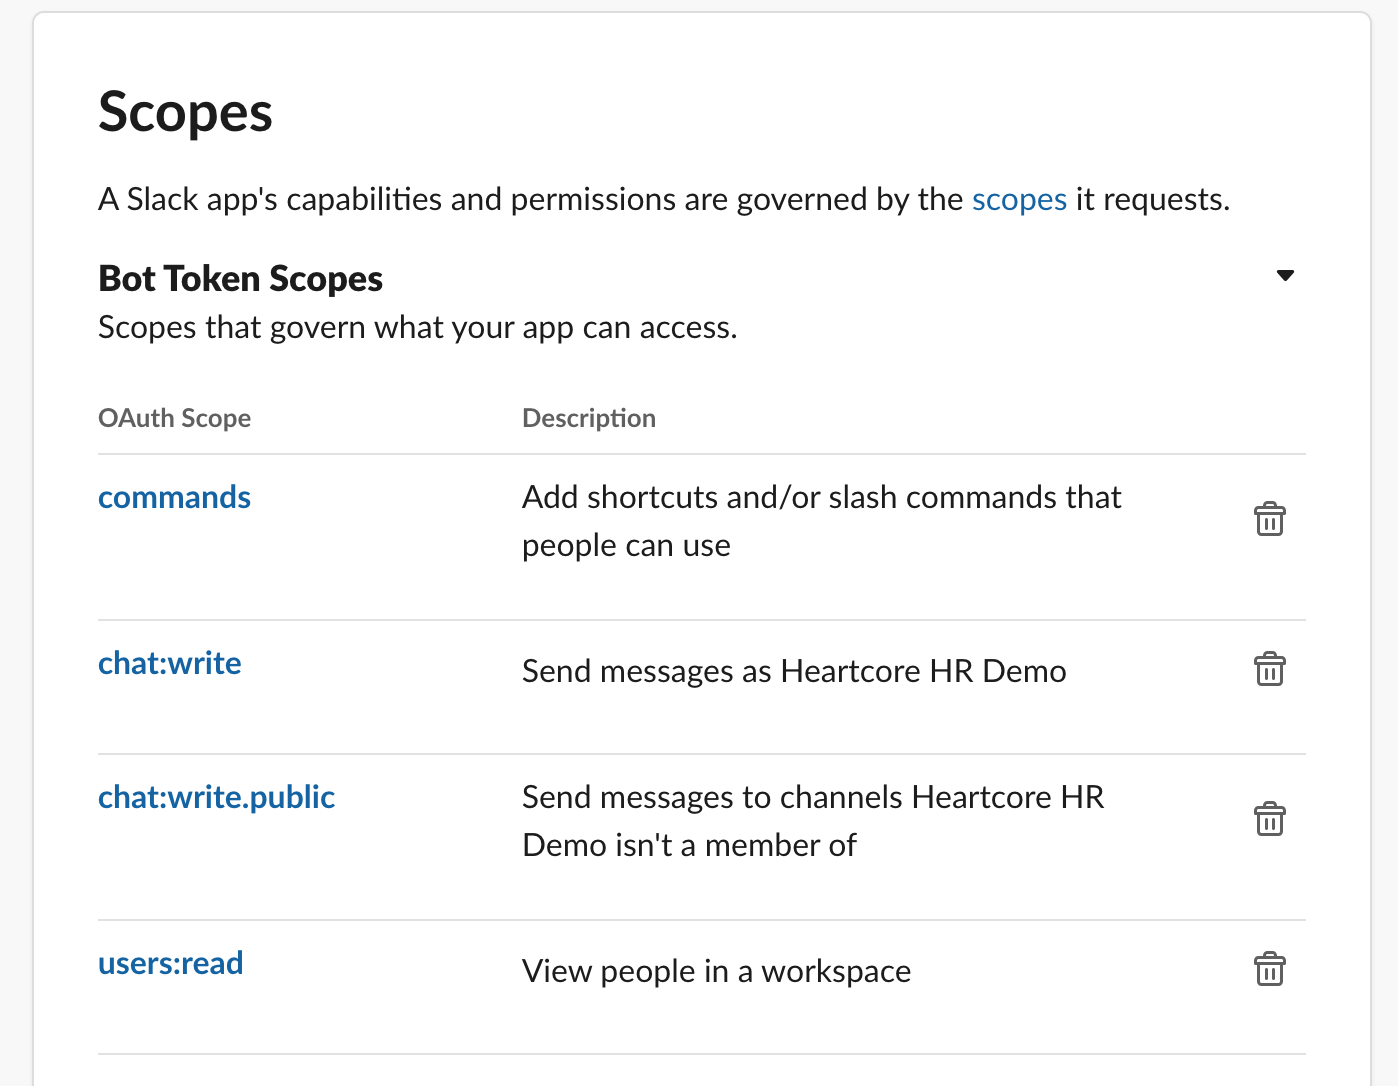
- Under Bot Token Scopes, click Add an Oauth Scope to determine what our Slack app is allowed to do. Add the following scopes:
commands- The primary scope needed to receive commands sent to our appchat:write- Required to send messages (including ephemeral responses) back to Slackchat:write.public- To post to channels our bot hasn't been invited tousers:read- Get user information about the users calling our botusers.profile:read- Get profile information for users calling our bot
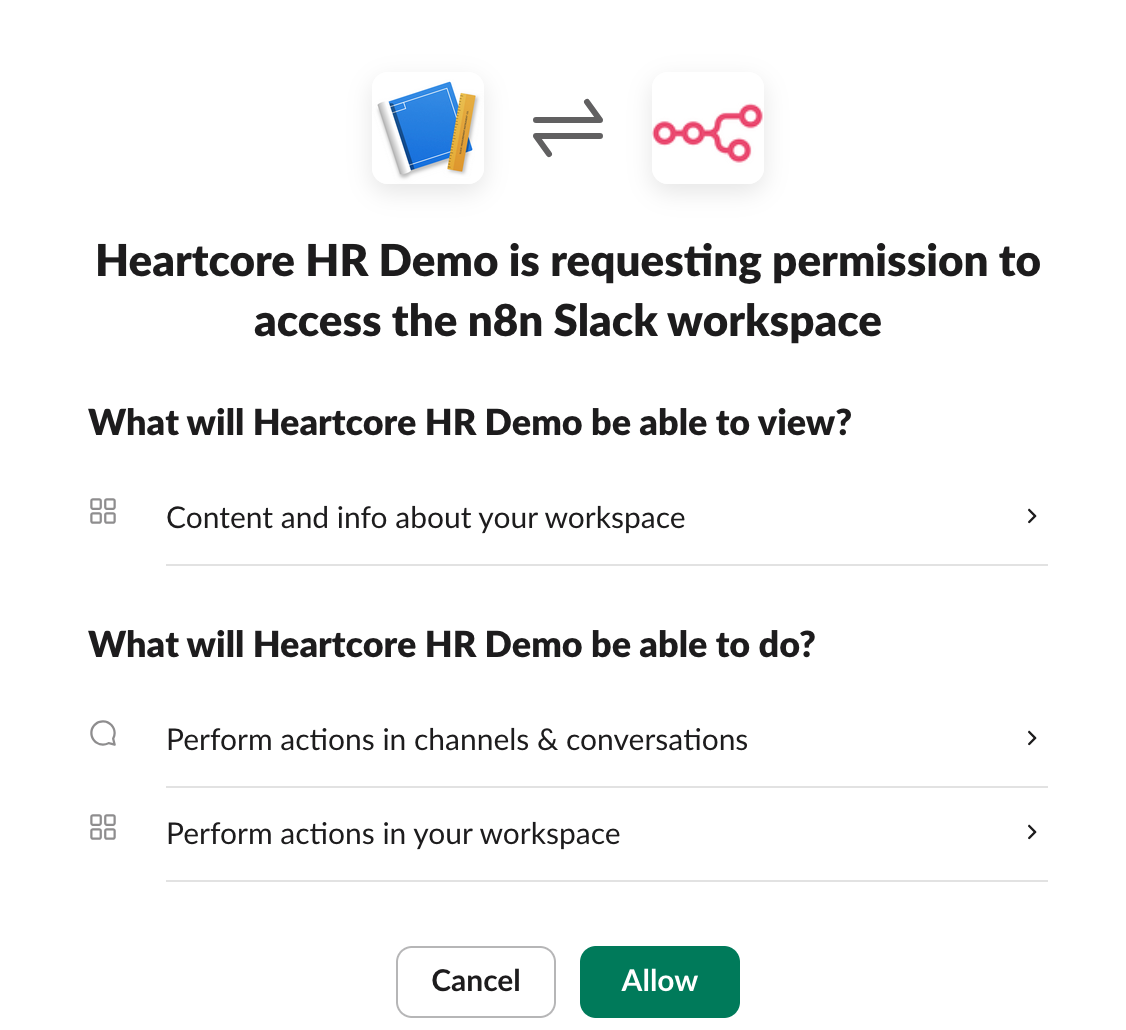
- Scroll up and click Install to, then click Allow on the next screen
- Slack will now show a Bot User OAuth Token. Save this token, we will need it later and keep the browser tab open, we will still need it for our next step.
n8n Workflow
- In your n8n instance, click on Create Workflow to create a new workflow
- Click on the plus button + to add the first node. Search for and select Webhook (this is how Slack will notify n8n about new questions).
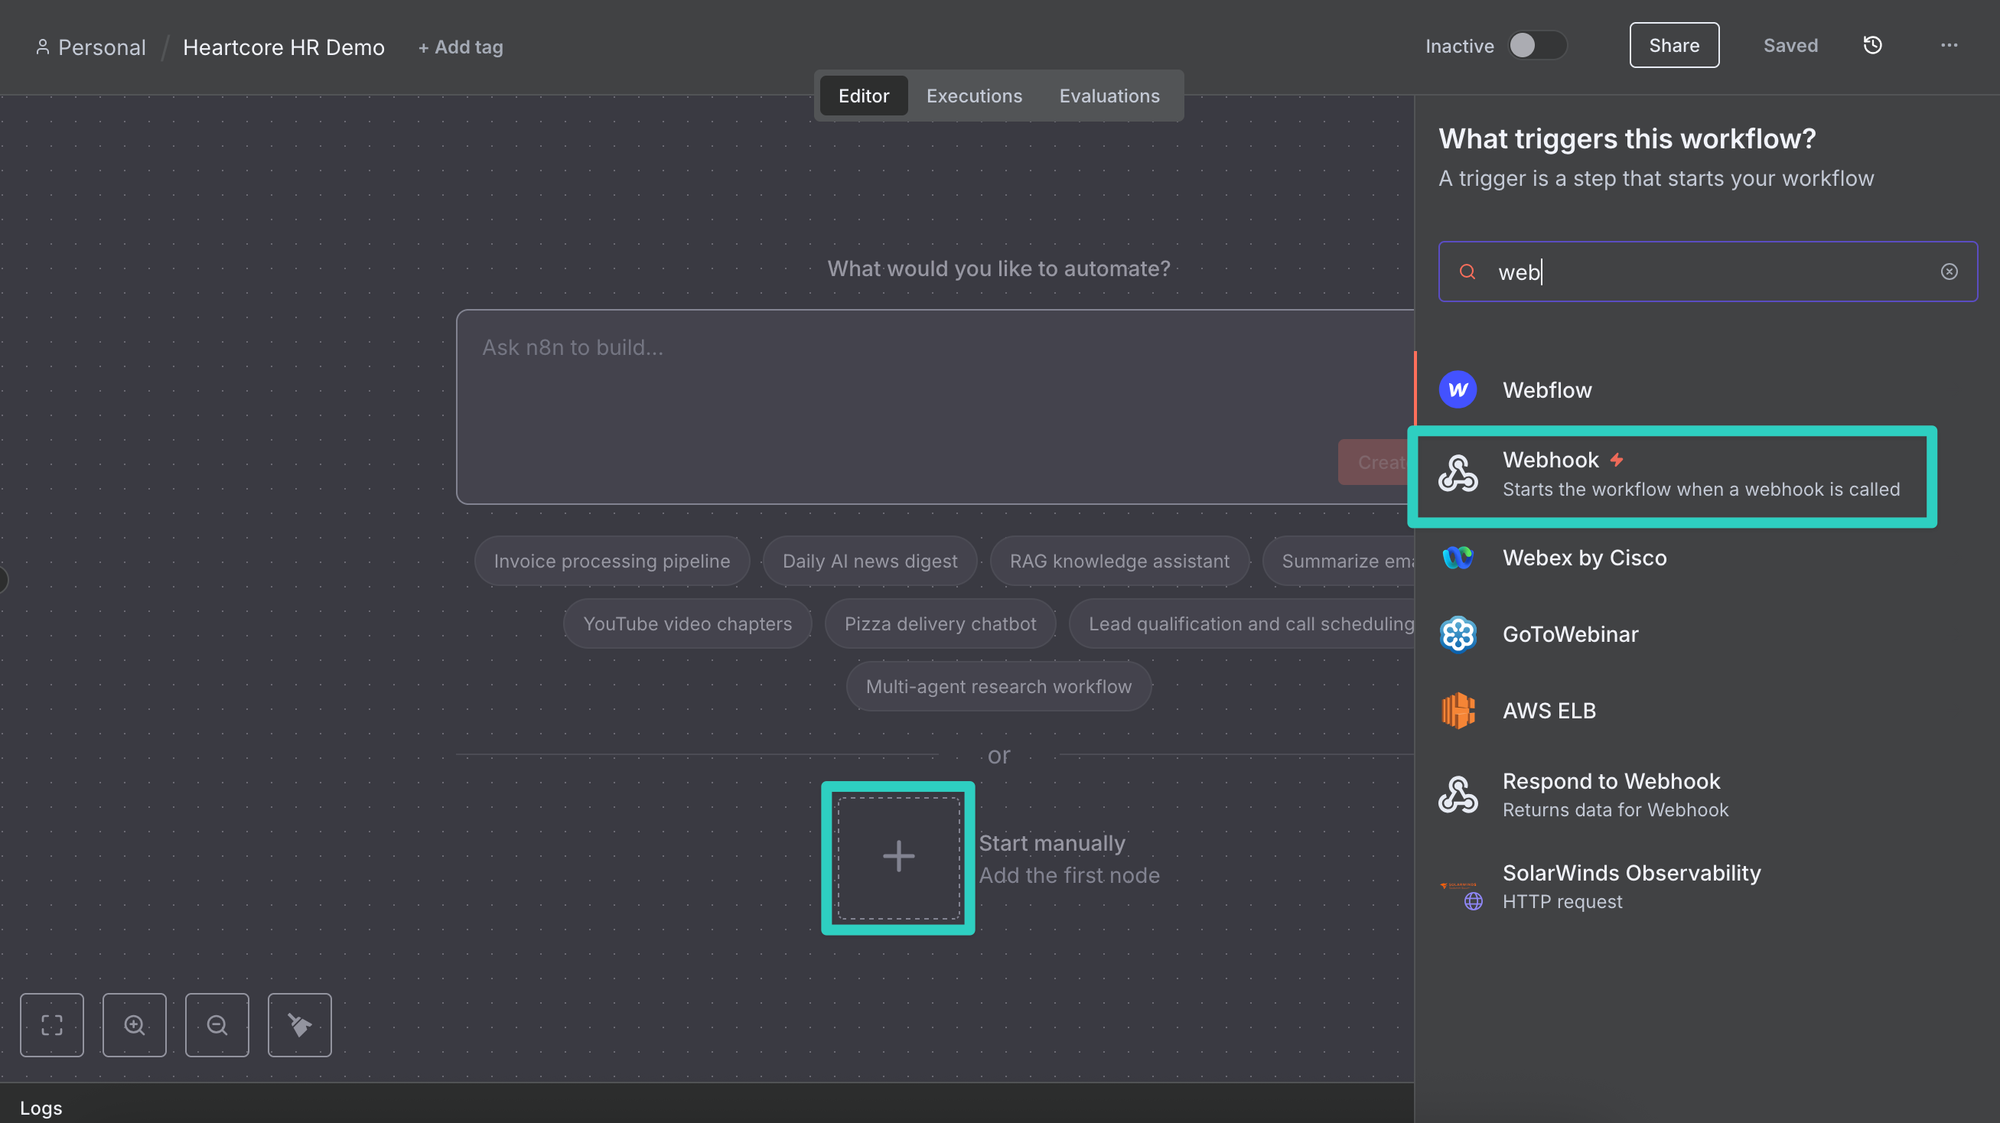
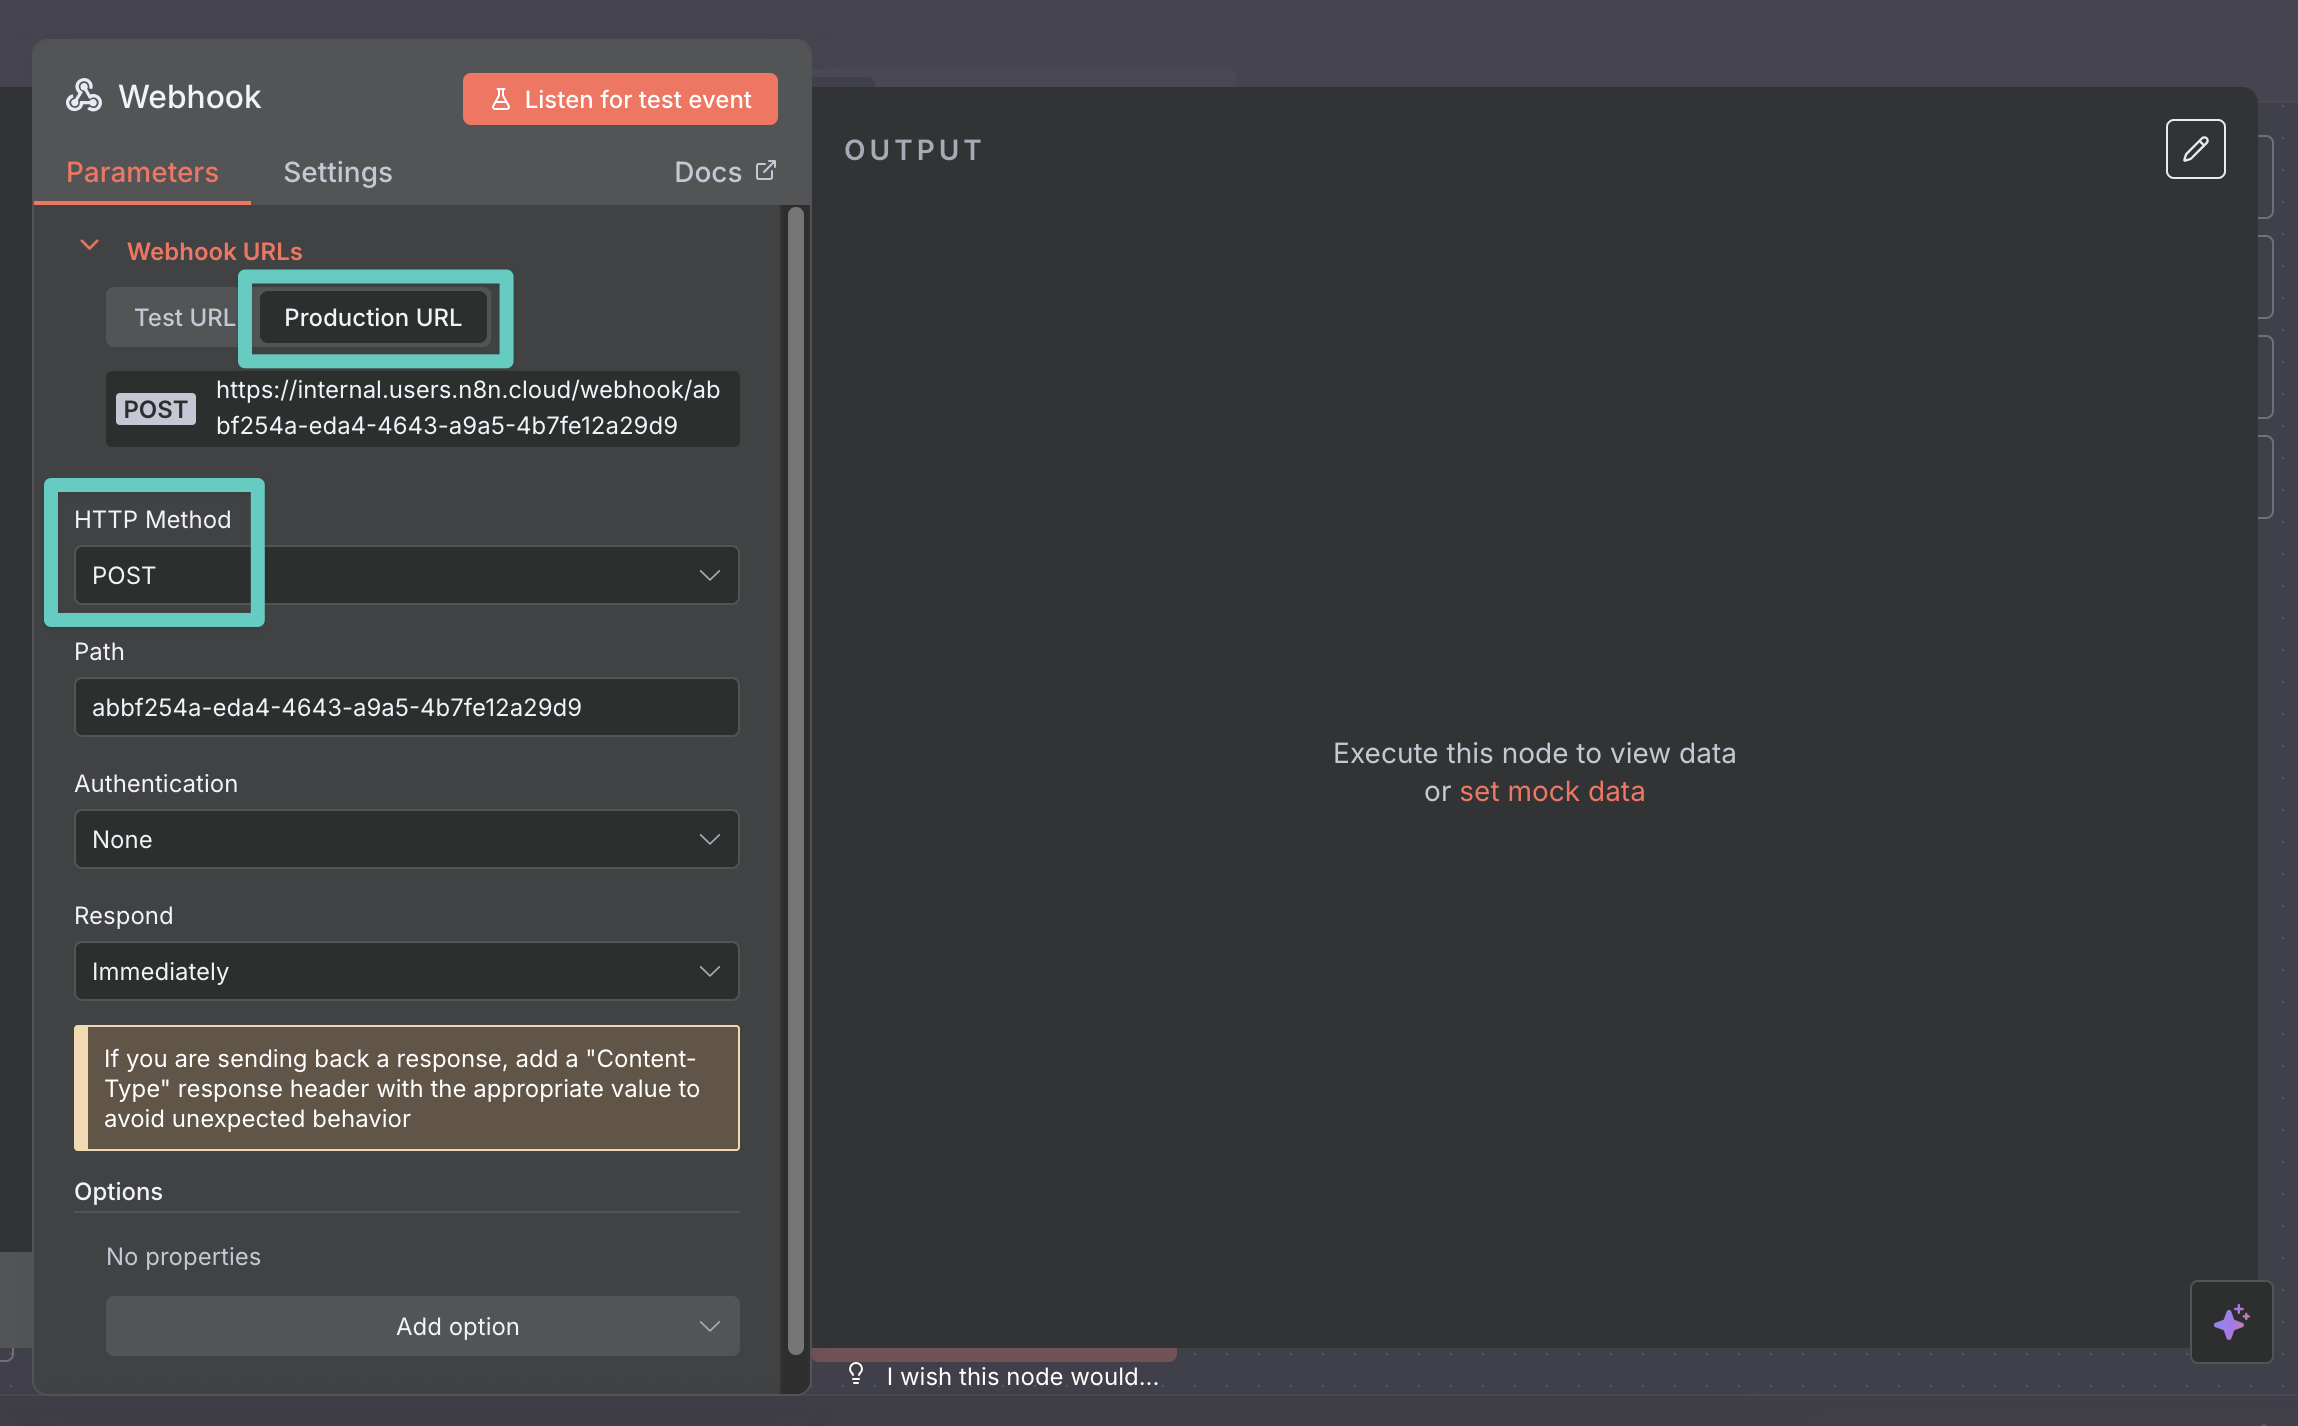
- After adding the Webhook node, the node details view opens. Since Slack will be sending us POST requests, switch the HTTP Method to POST here.
- Next, click on Production URL and copy/save the URL shown by n8n as we need it later.
- Click on Back to canvas to close the webhook screen. Then switch the Inactive toggle to Active.
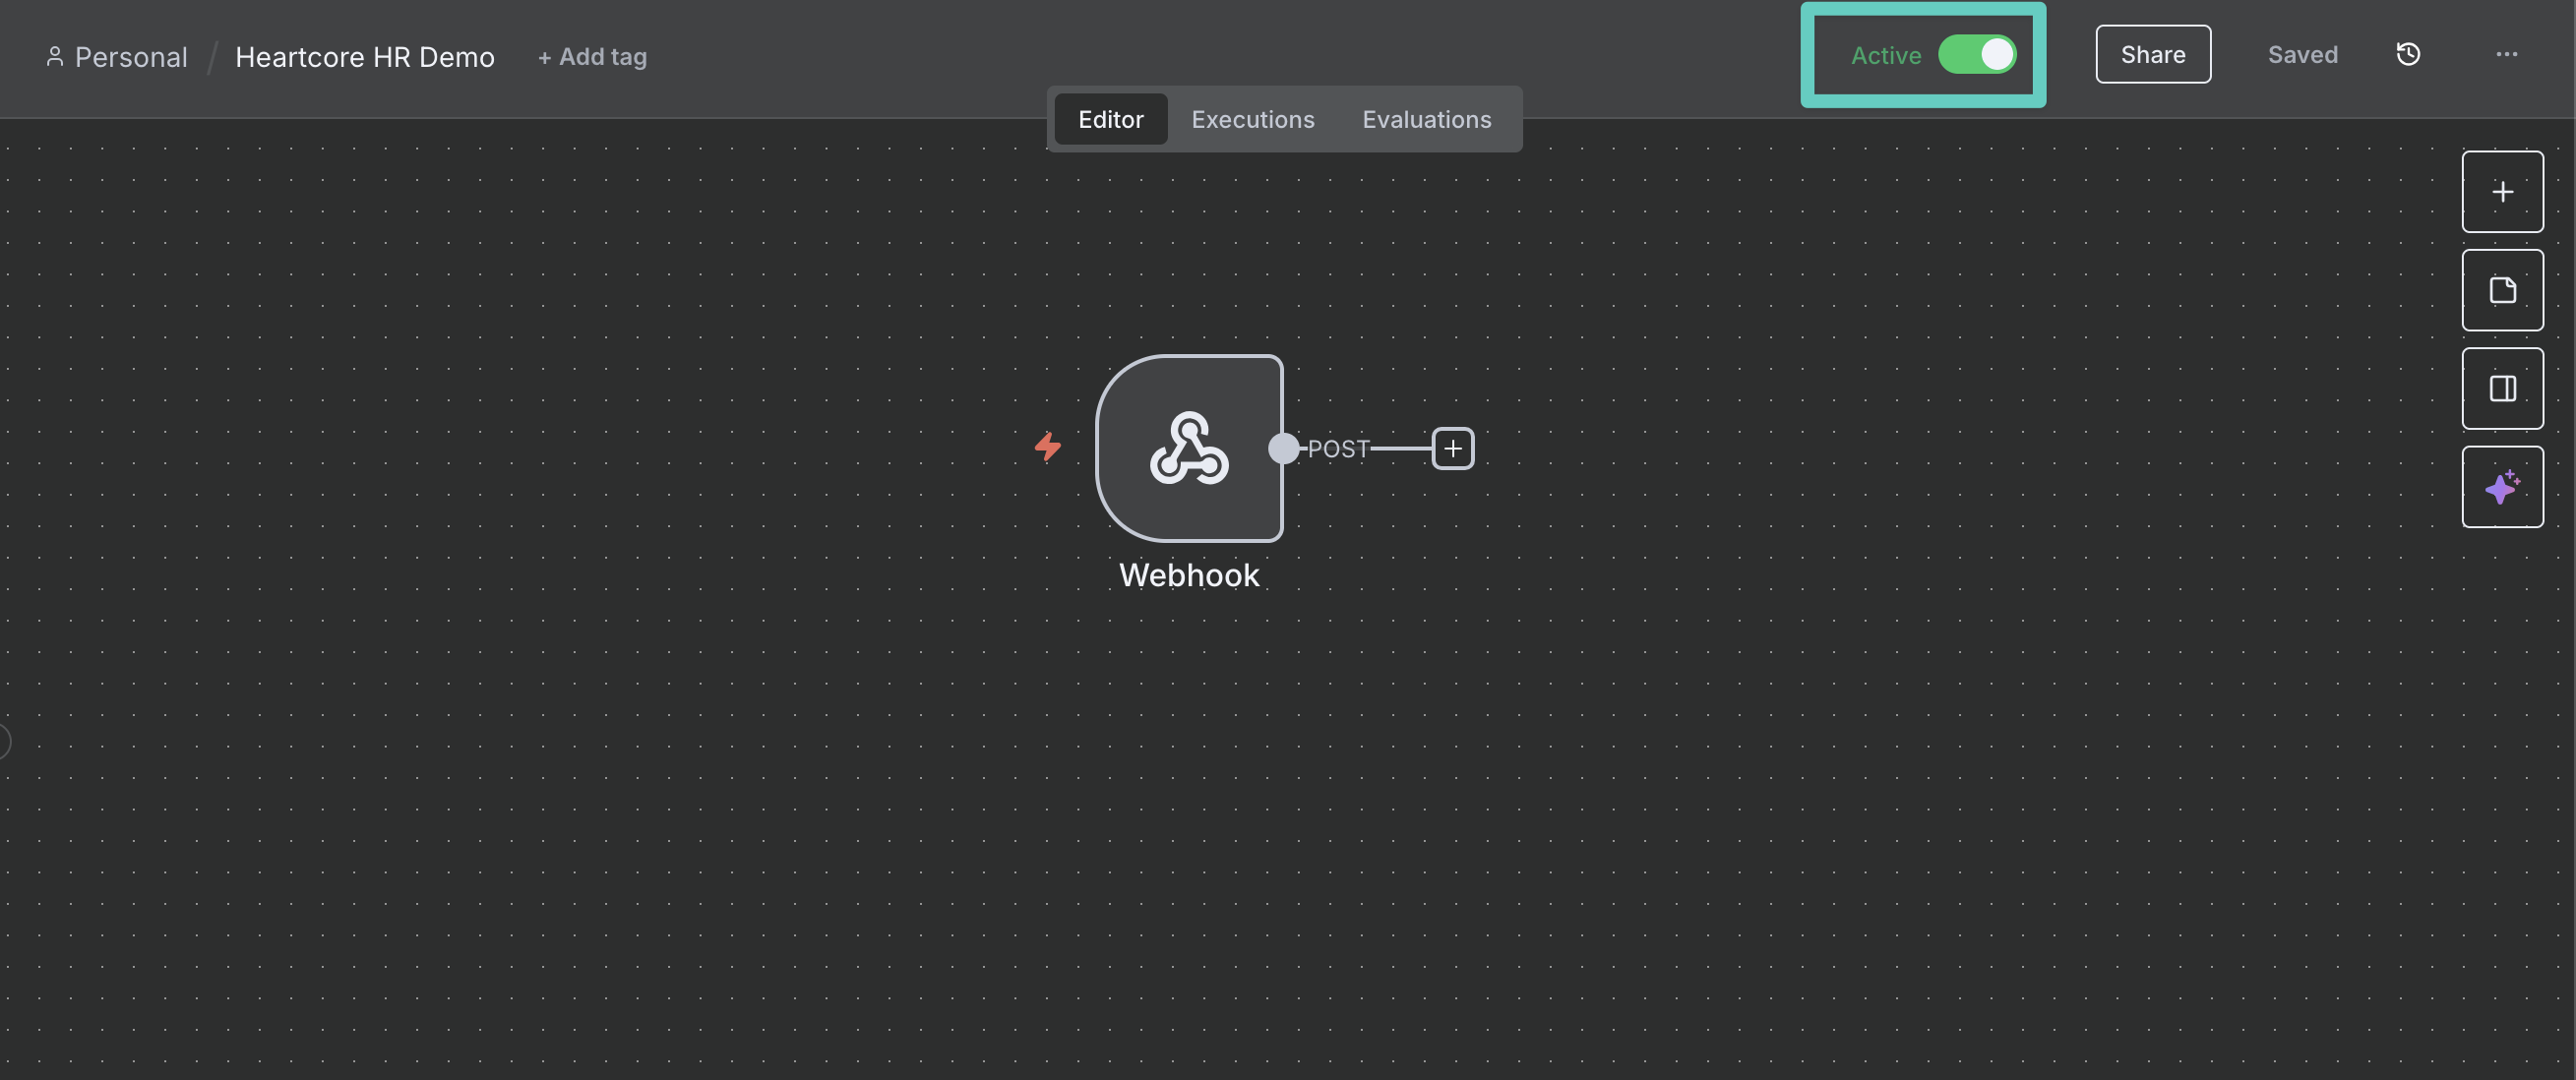
- Click Save once done.
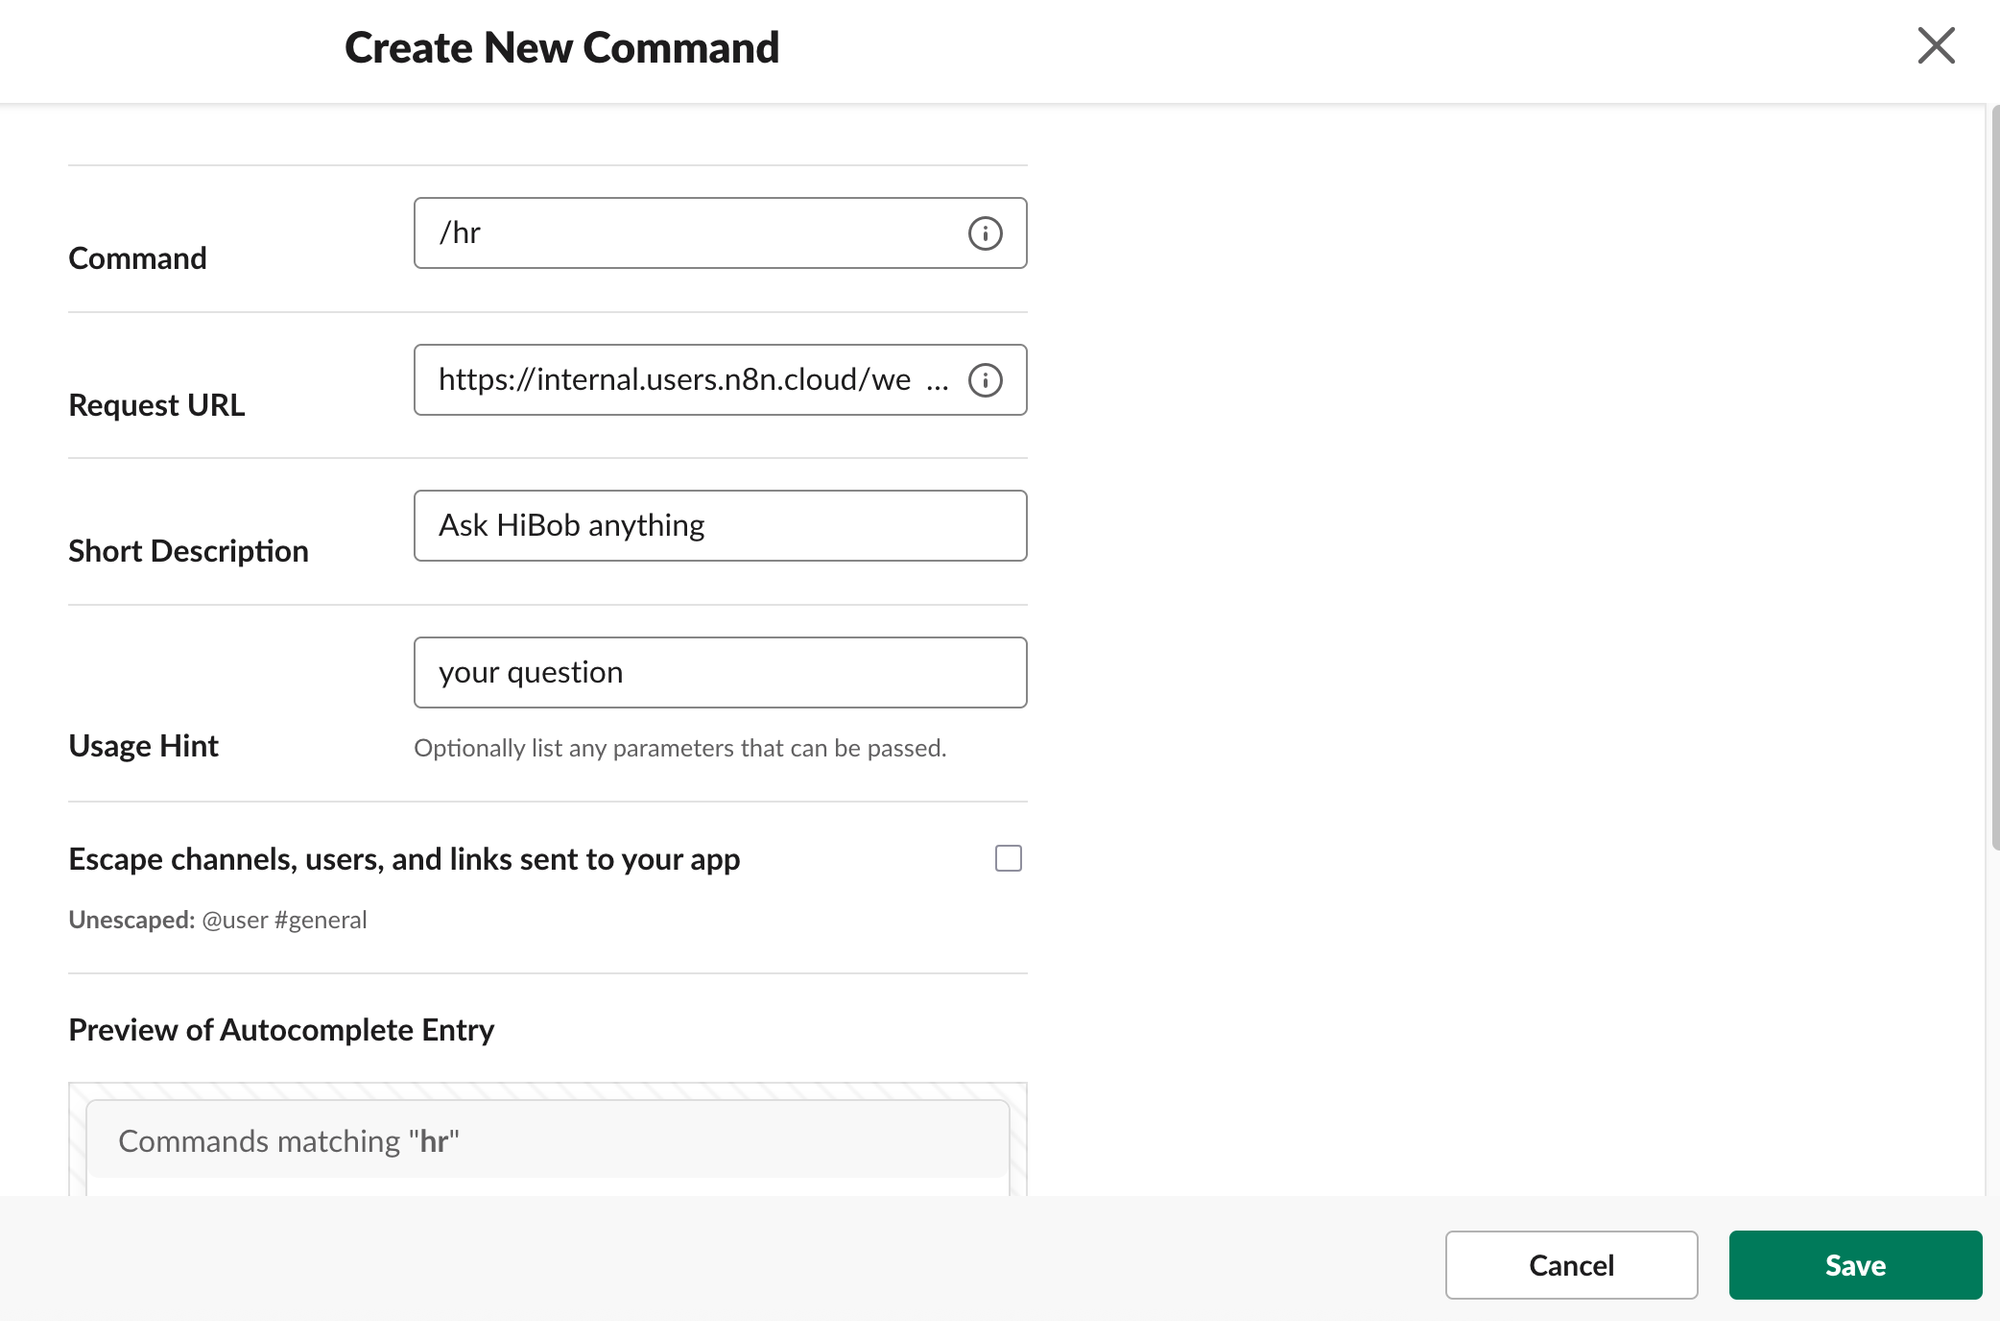
- We now need to share our Production URL with Slack. Navigate back to the Slack tab and select Slash command in the left sidebar.
- Click on Create New Command and fill in the following details:
- Command: This is the command you'll use to call your AI agent. It can be anything, but in our demo we'll use
/hr - Request URL: This will be the Production URL from n8n
- Short Description: This is a free text field, so we can go wild here. For our demo we use
Ask HiBob anything - Usage Hint: This tells Slack users which parameters we accept. This is also a free text field and for our demo we'll use
your question
- Command: This is the command you'll use to call your AI agent. It can be anything, but in our demo we'll use
- Once you're happy with your settings, click Save
- Now the slash command should be available in our Slack instance. Confirm this by heading to any public Slack channel and posting
/hr when was my start date(don't worry, posts starting with a slash command will only be visible to you and no one else) - Once your request is sent Slack should show a rather ugly response:
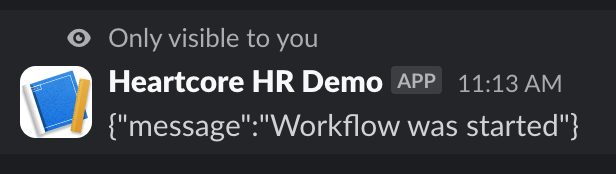
- Despite the content being not particularly helpful, this is a success message. It tells us that Slack can communicate with n8n, as this is actually the default response that n8n returns whenever a webhook is called. We'll replace it with an actually useful message now!
Workflow building
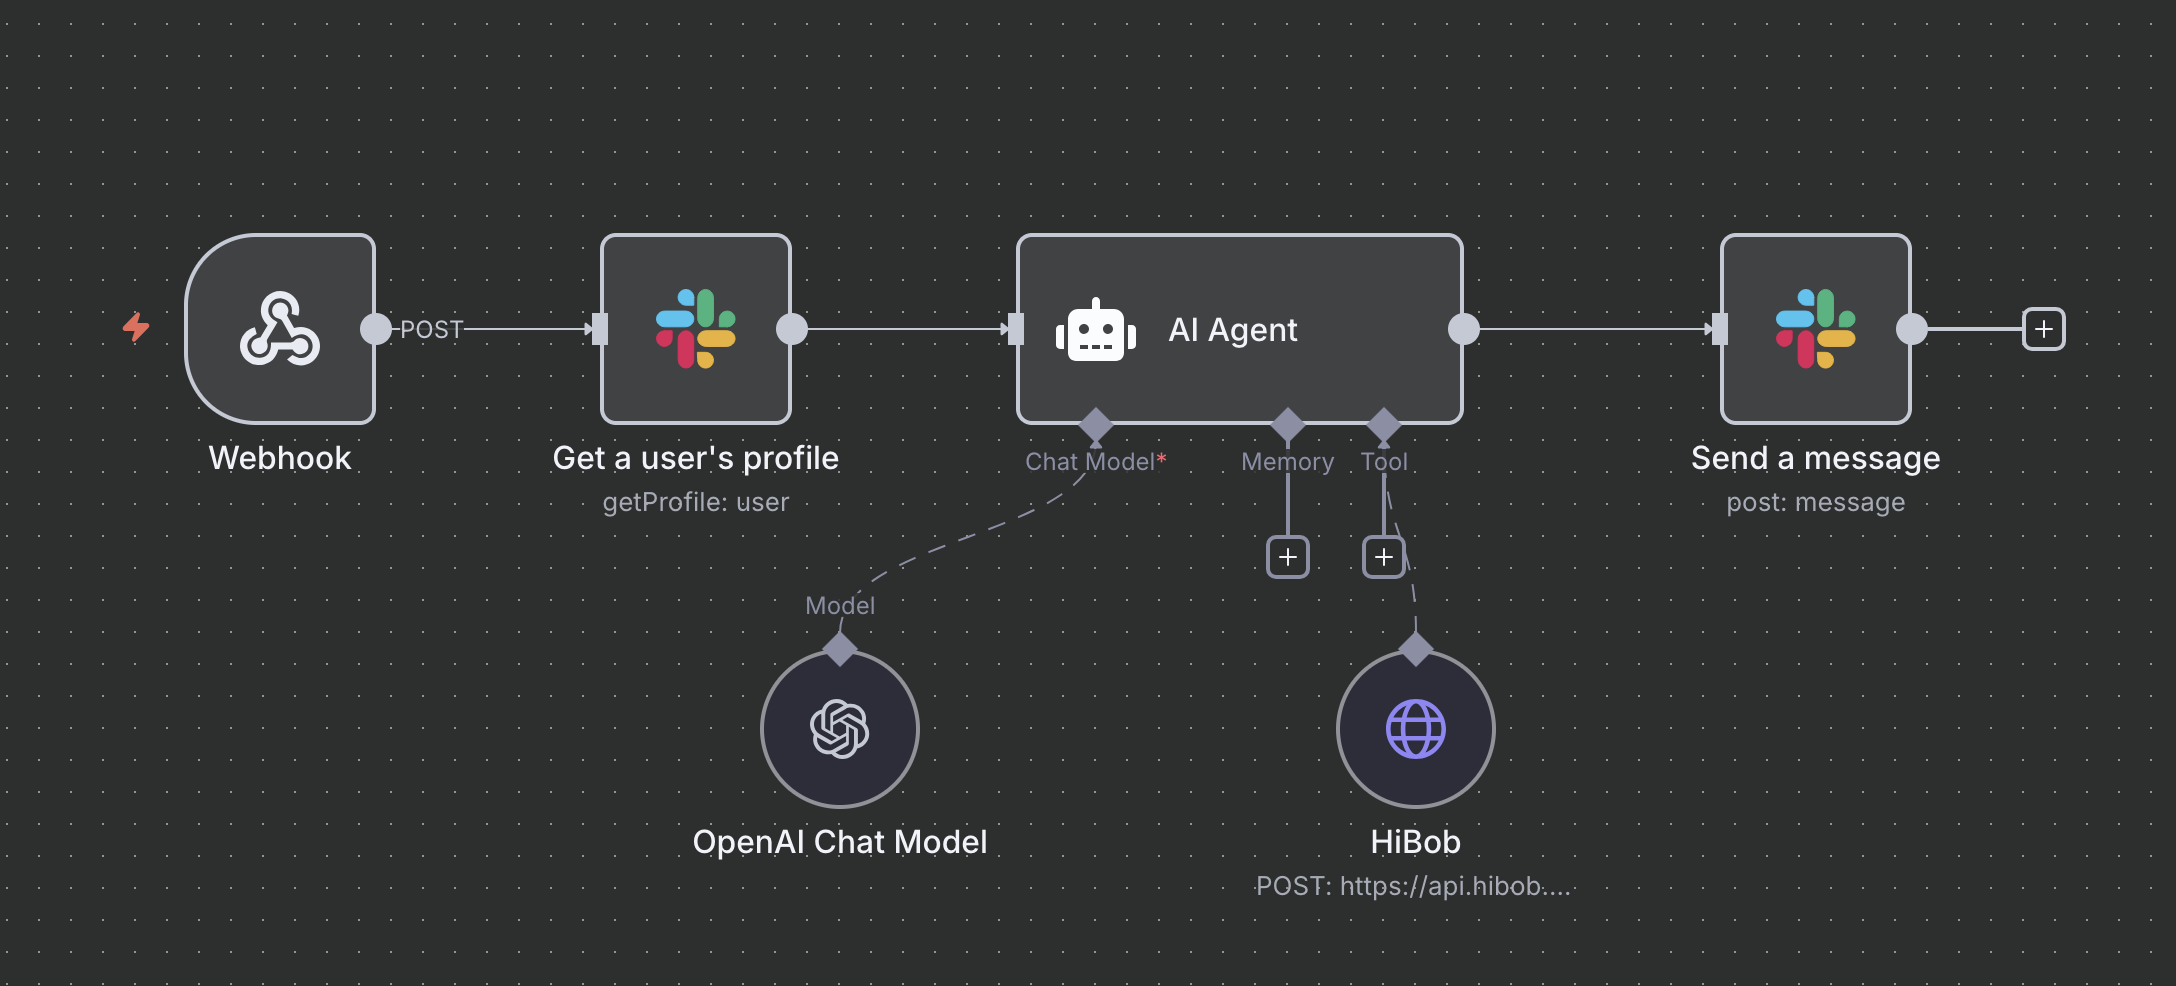
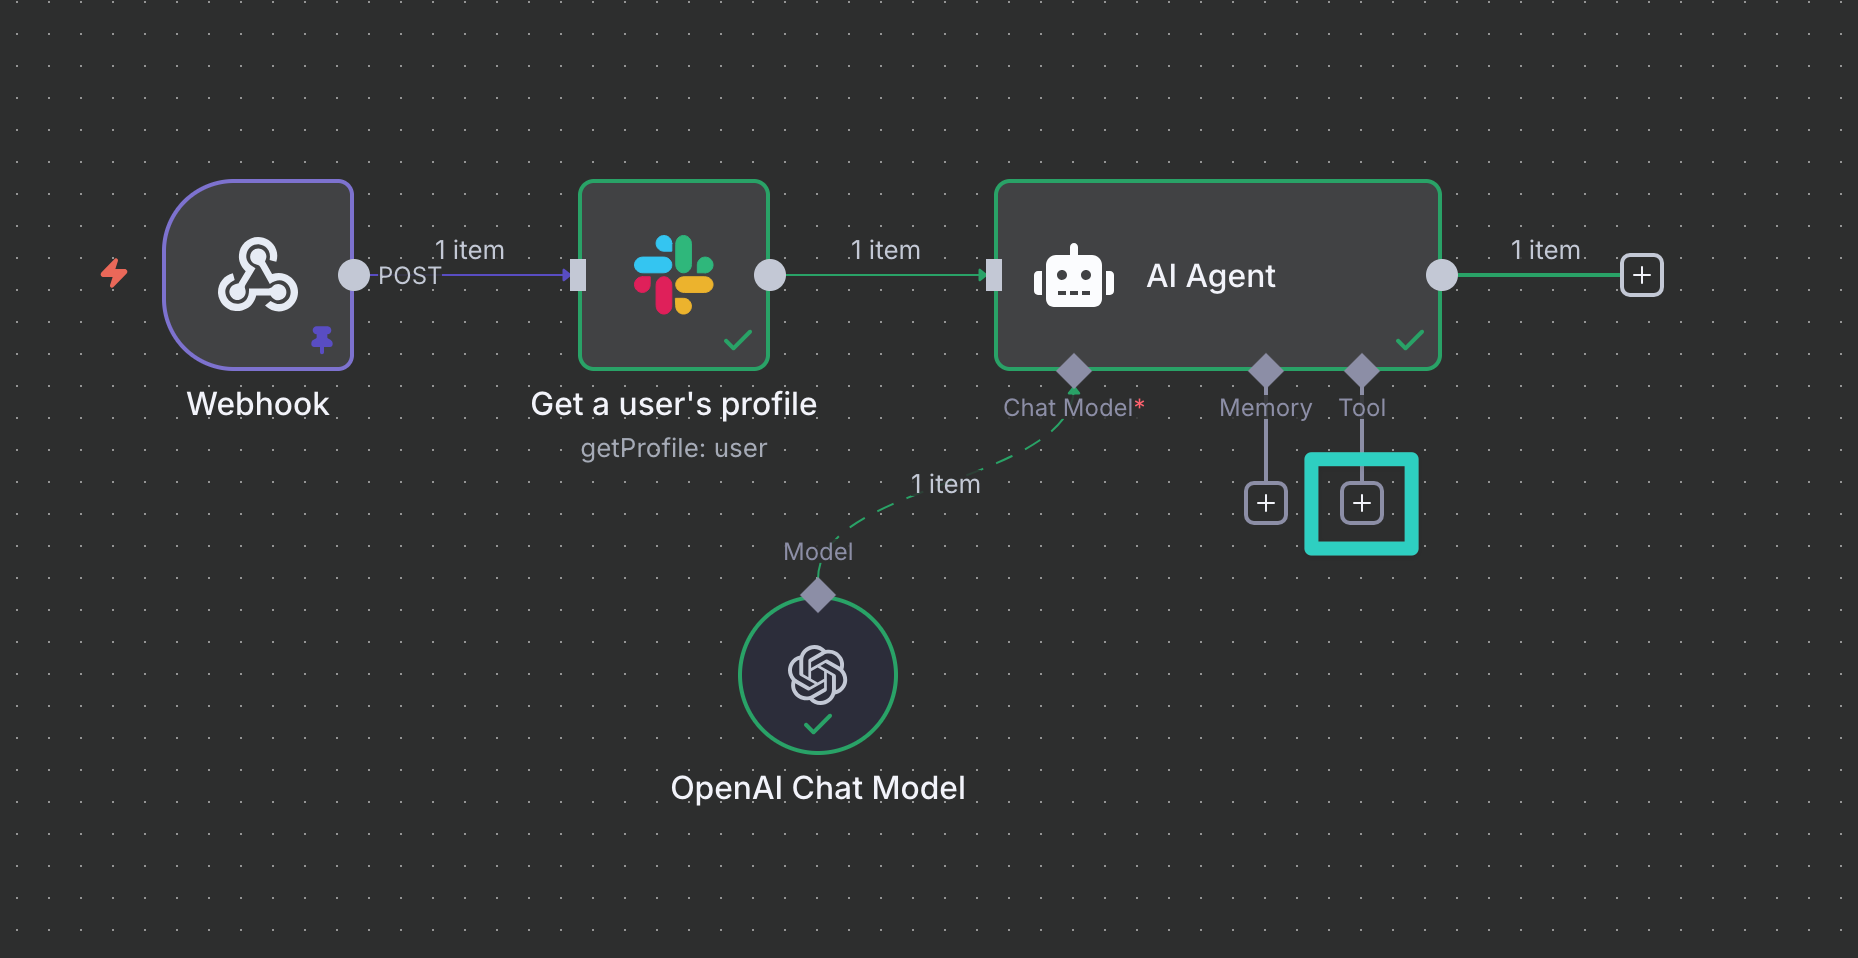
Now that Slack can send information to n8n, we'll build the full workflow answering our questions. It will look like so when done:
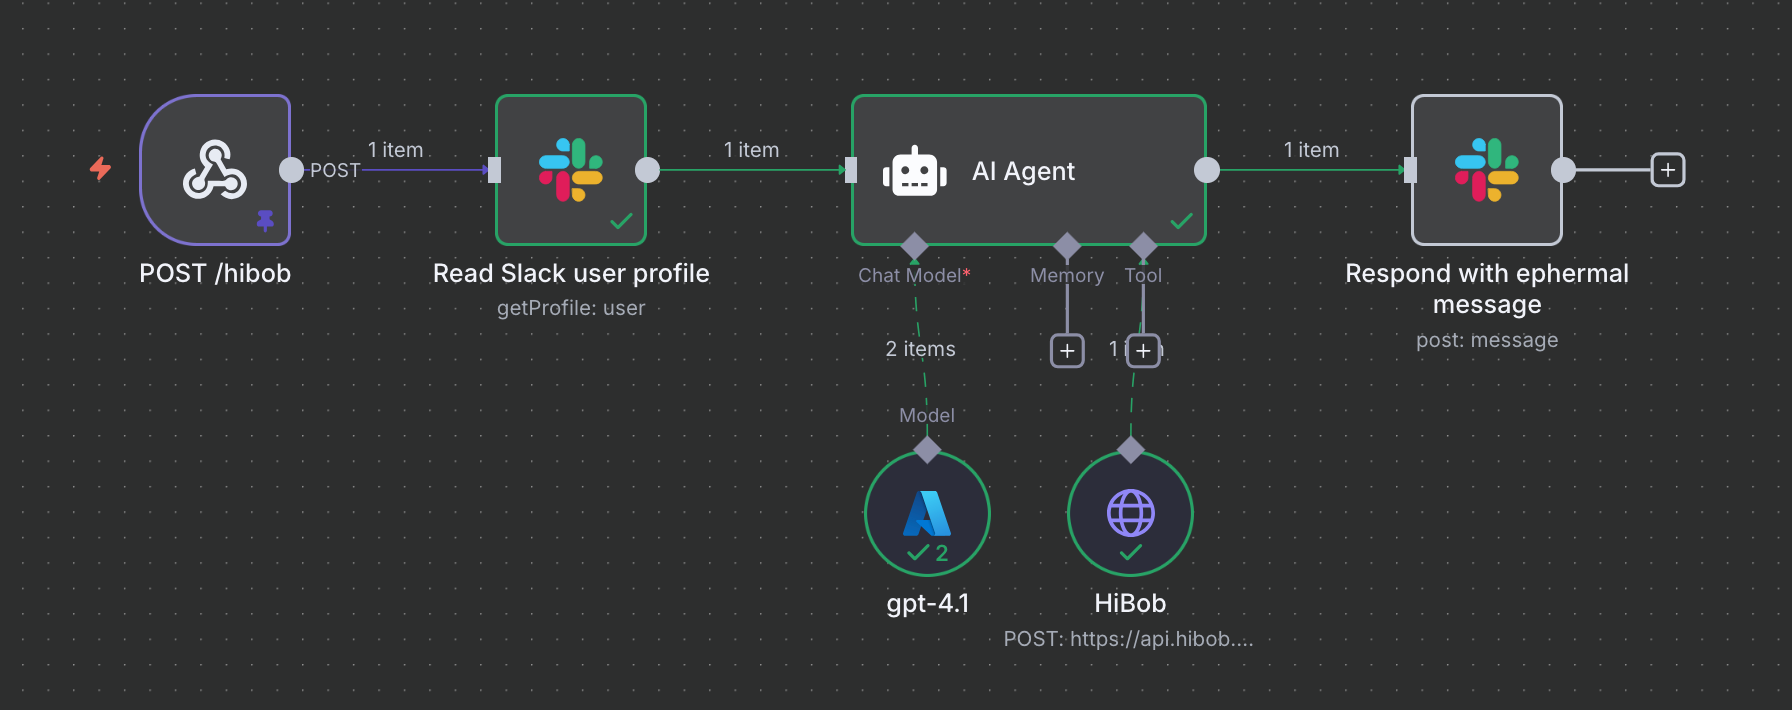
As you can see we have our initial webhook node, but have now connected it to two Slack nodes and an AI Agent node (which in turn is connected to GPT-4.1 and HiBob). An n8n workflow is generally edited through two different screens. The screenshot above shows the canvas and allows you to connect different nodes with each other. It also allows saving and activating (or deactivating) a workflow. Double-clicking any node opens the node details view instead. While in the node details view you can always navigate back to the canvas by clicking Back to canvas.
Webhook
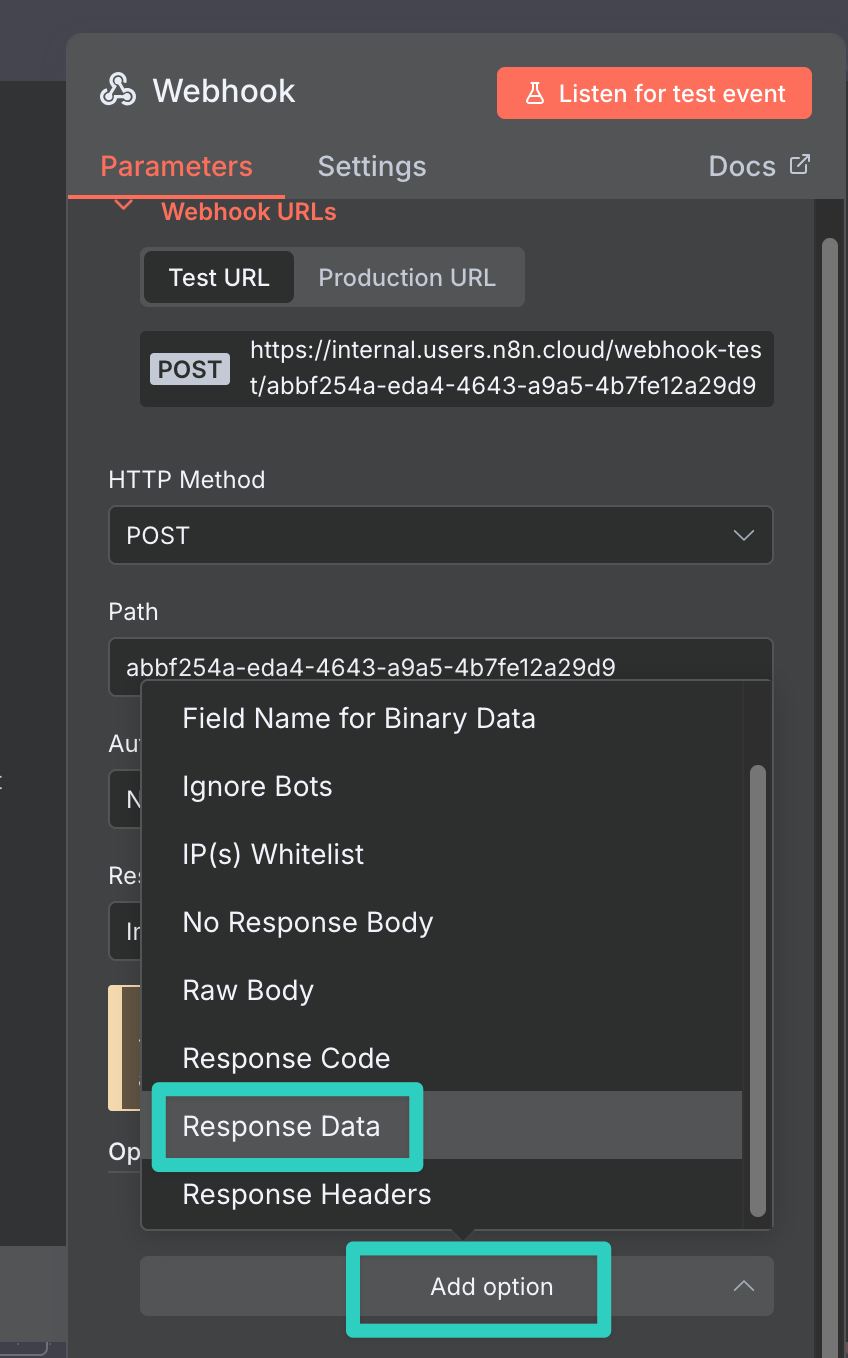
Let's start by tweaking our webhook node. Remember that {"message":"Workflow was started"} message in Slack? Let's replace it with something more user-friendly that describes what we're doing whenever we receive a command.
Open the node details view and click the Add option button at the bottom. Select the Response Data option:
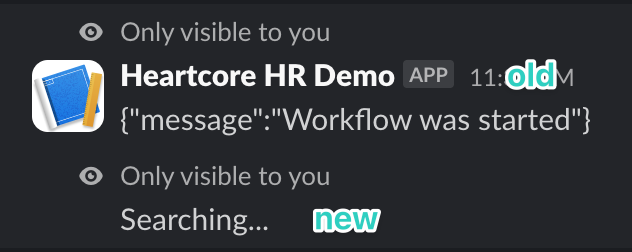
Enter a text like Searching..., head back to the canvas and save your workflow changes. Now head back to Slack and test the /hr when was my start date command once more. Slack should show Searching... instead of the old message. Much better, right?
Of course we're not answering the question yet. So let's start changing that and
Know who's asking: Slack user search
At this stage we can see n8n responding to Slack, but we don't actually see anything happen in n8n yet. This is because we're using our Webhook's Production URL. A production execution in n8n happens completely in the background. This is great for actual production scenarios but can be a bit tricky while building our workflow. n8n offers test executions for that but these require a separate URL and complicate things on the Slack side.
Luckily we can still work with our production data, it just requires retrieving it first. So, on the n8n canvas, head to the Executions tab:
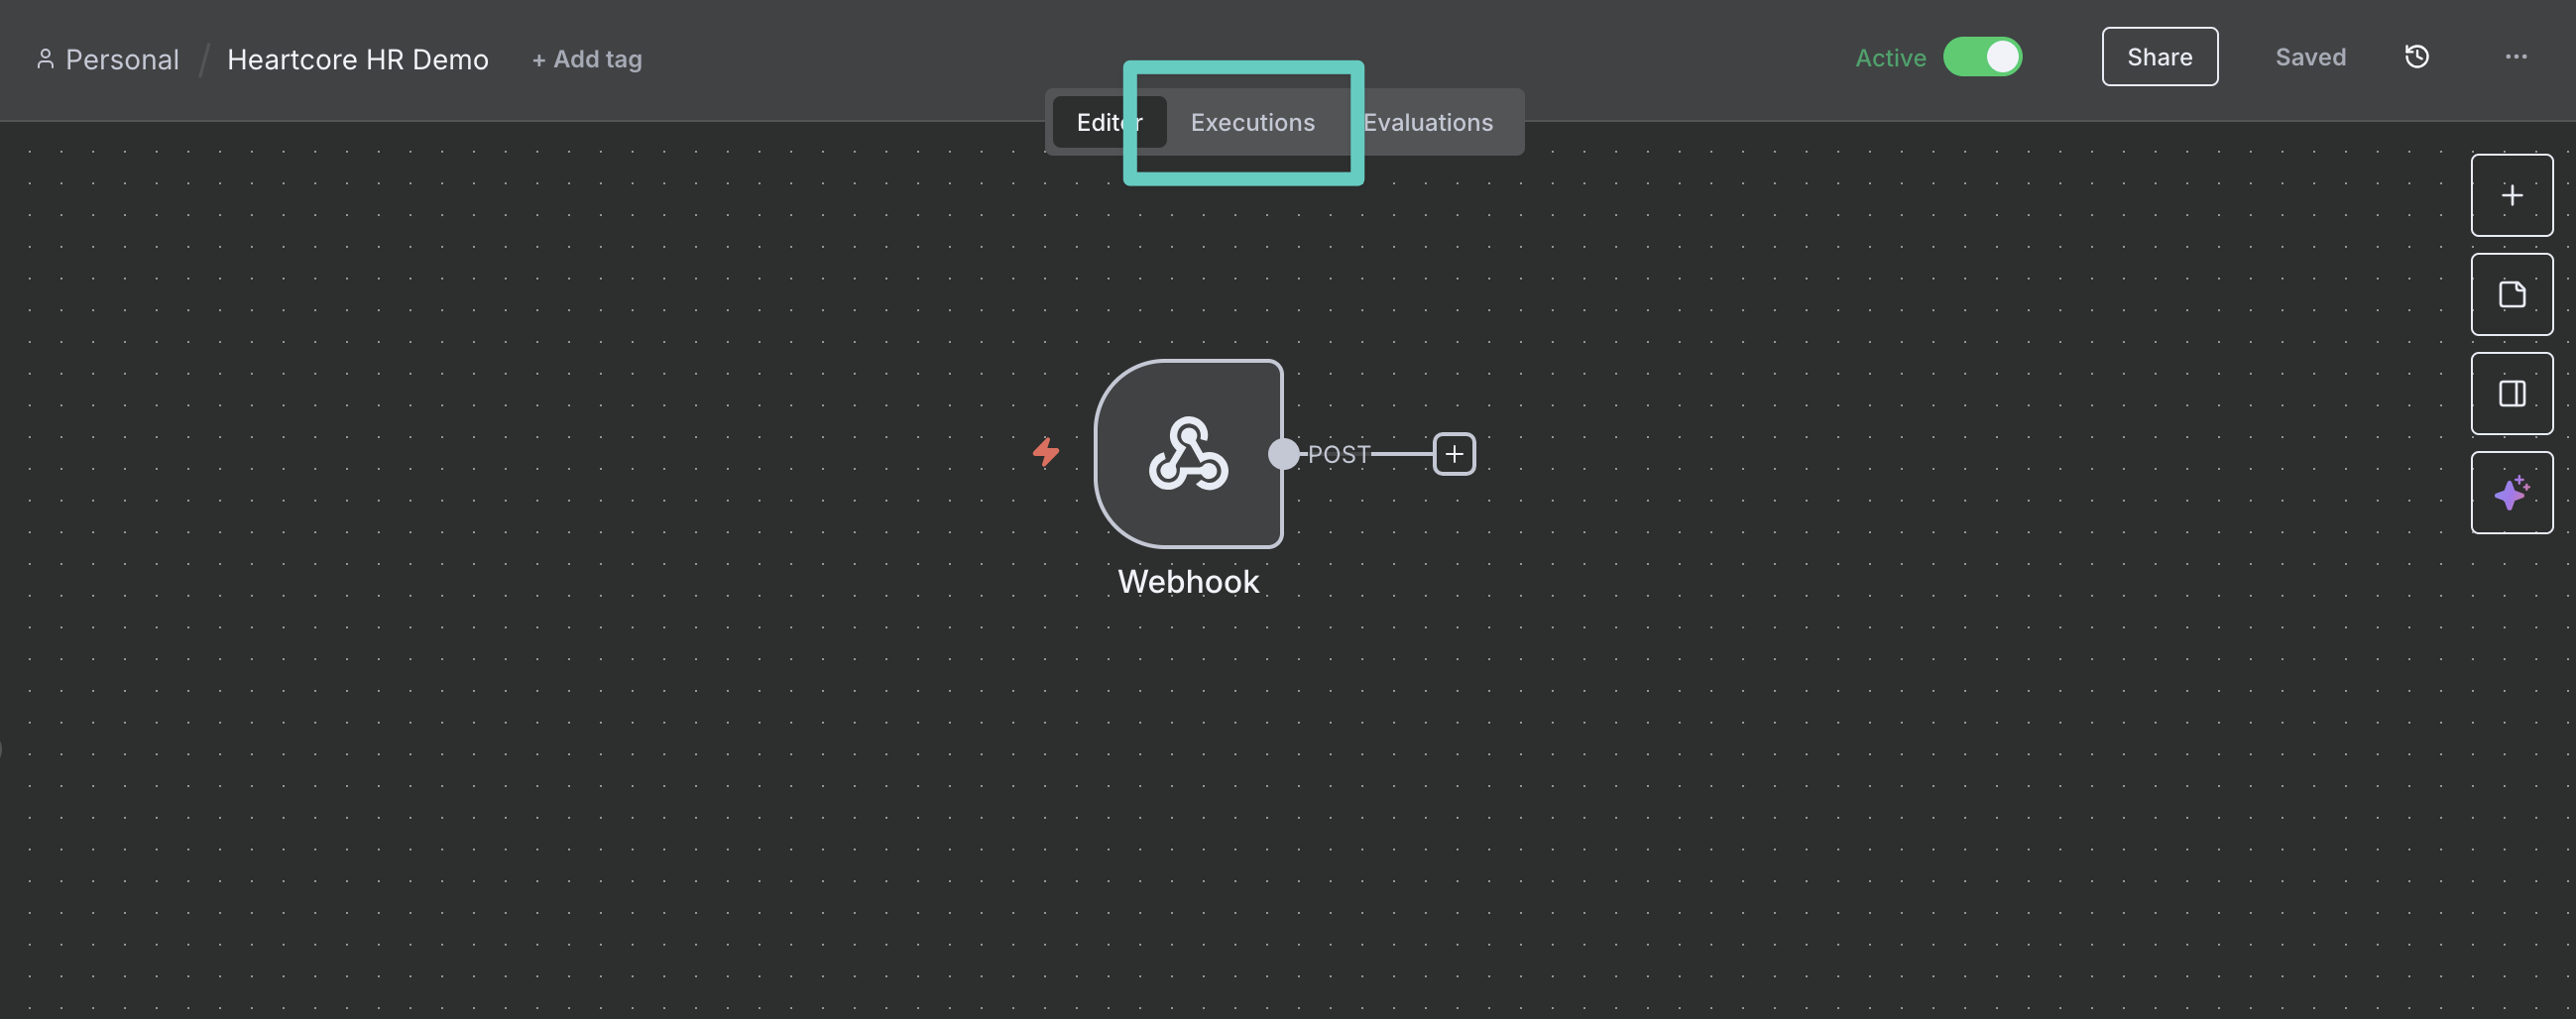
Now pick the most recent execution in the left sidebar and click Copy to editor:
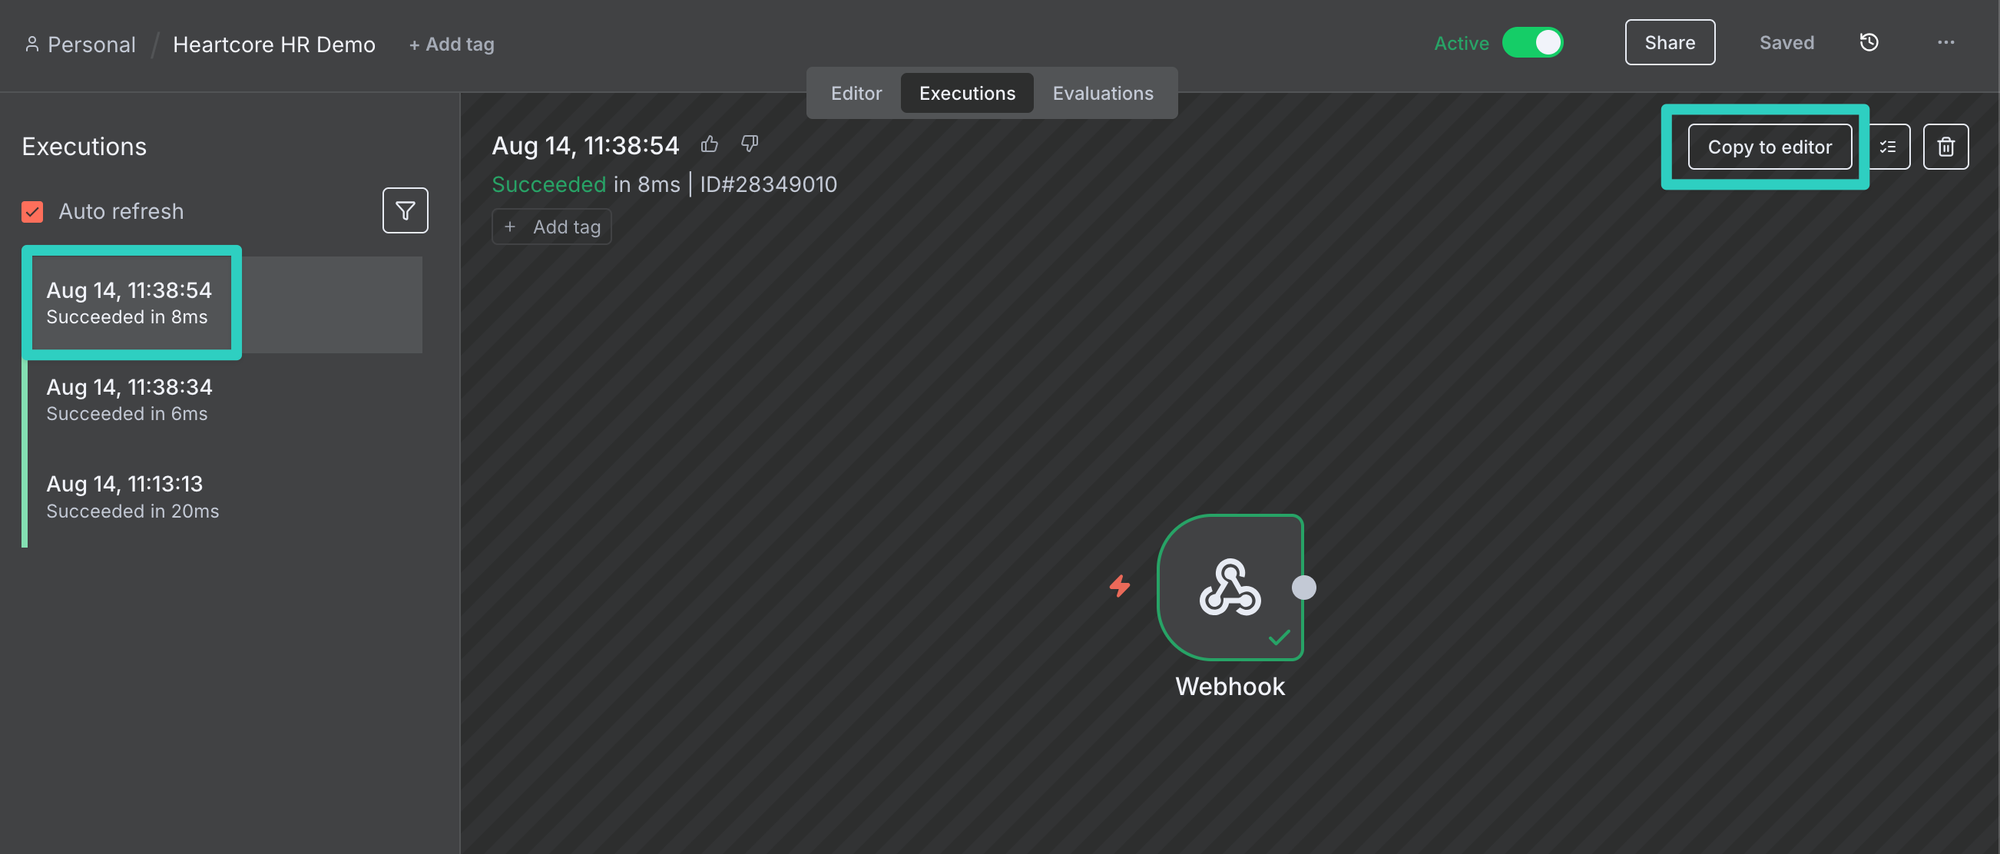
This brings you back to the Editor and you will now see that our Webhook node has a little pin icon next to it, indicating that we've got pinned data from our production execution to work with. So let's do that!
Clicking on the plus icon + next to the webhook node to connect the next node and search for Slack. Select Slack once shown and pick the Get a user's profile action.
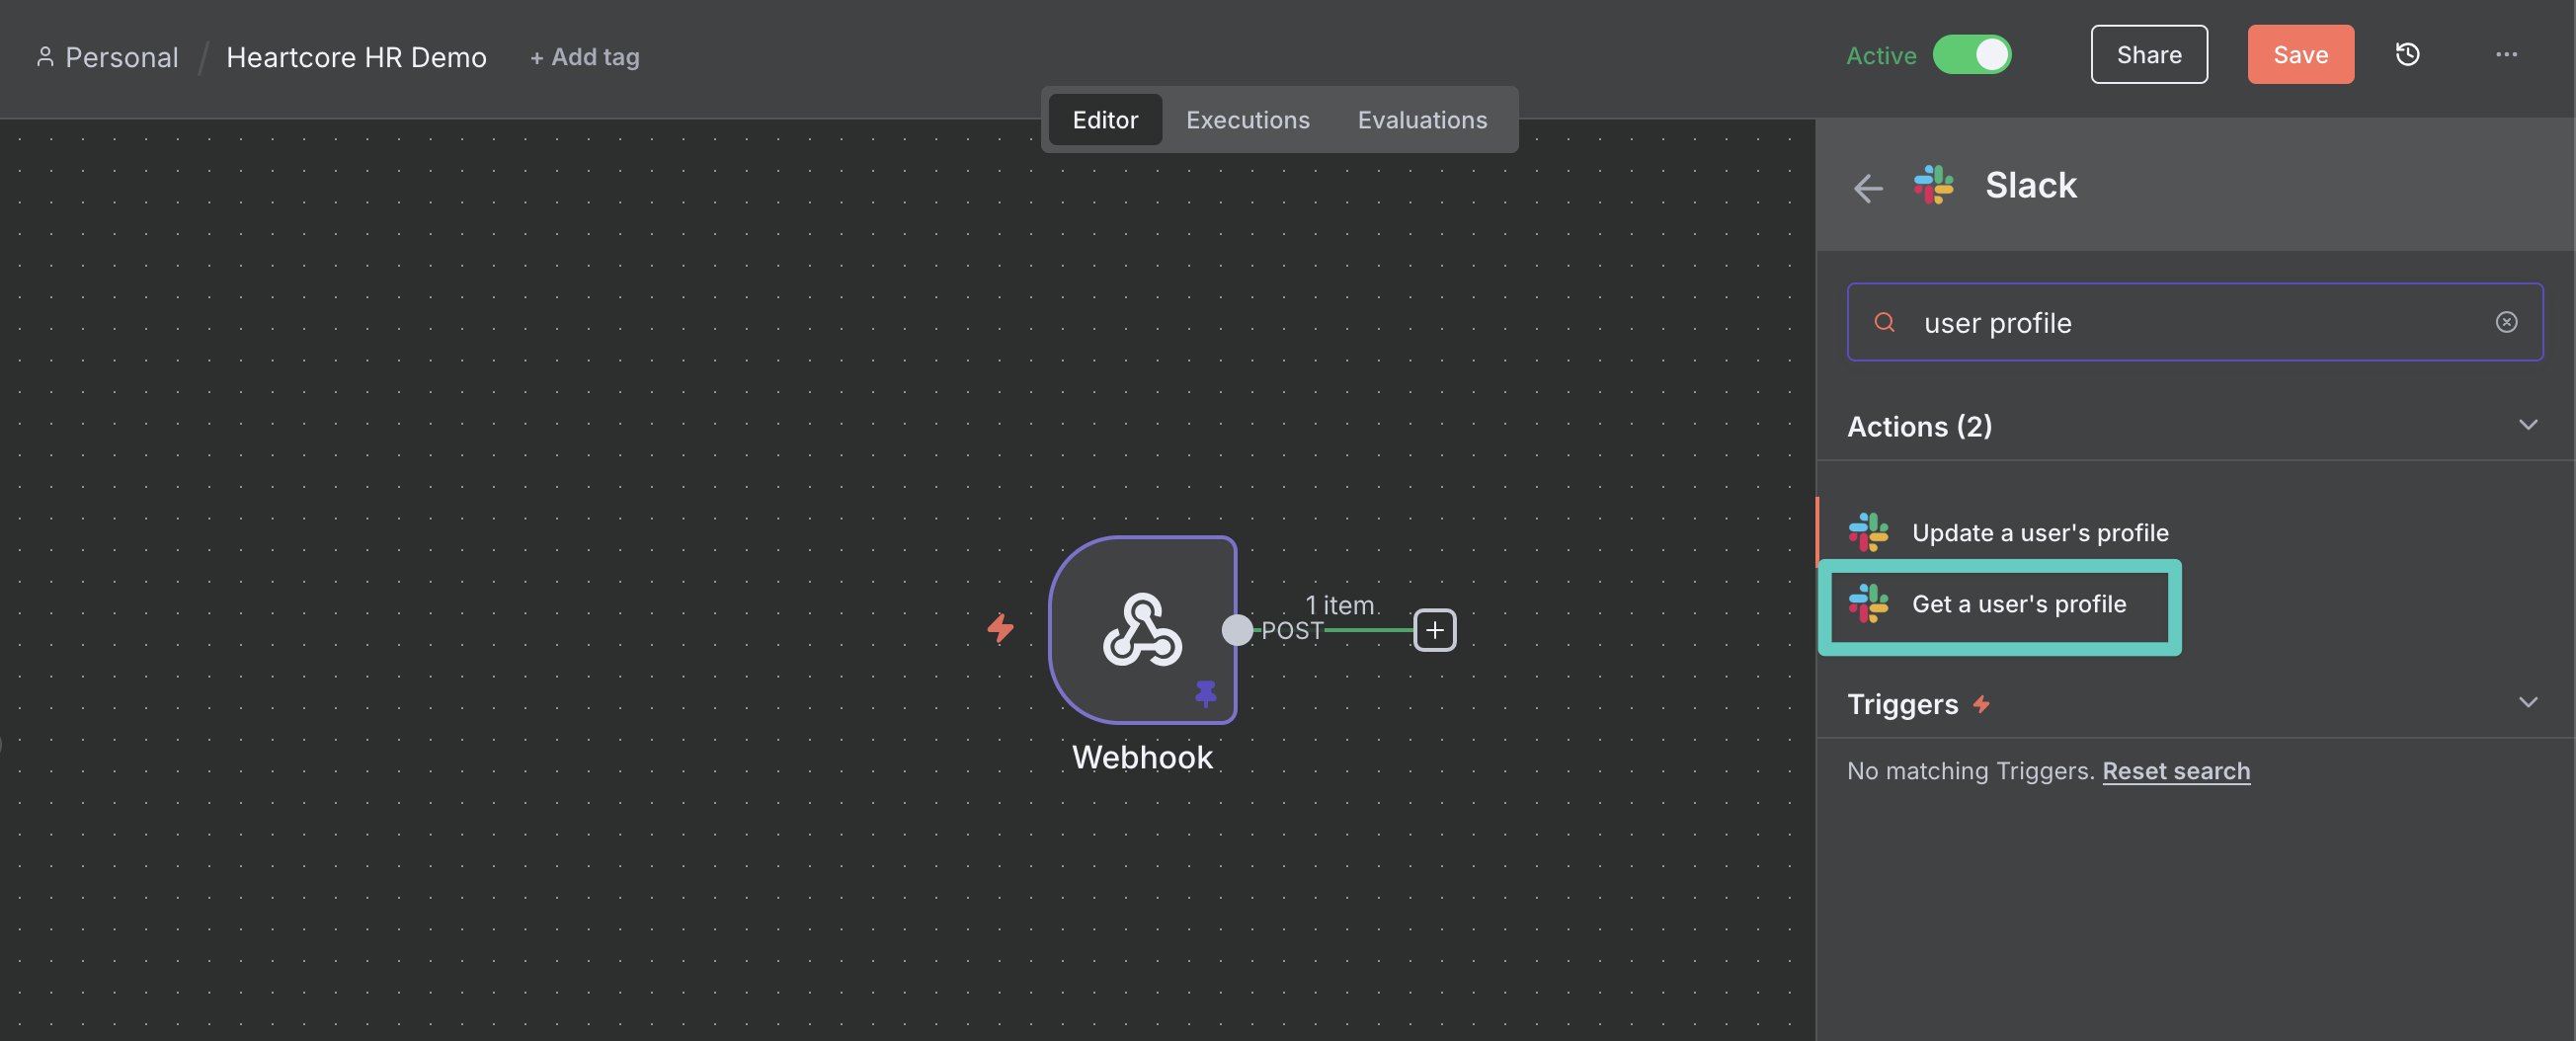
We'll use this information to give our AI agent a little bit of context about who is asking a question (since employees don't typically refer to themselves in the third person).
Once you have selected the action, the node details view automatically opens and you'll see the incoming data on the left, the node settings in the center, and the output on the right (currently empty). First we need Slack credentials we can work with. Open the Credential to connect with dropdown and select Create new credential (this only has to be done once). On the credential screen select Access Token, and past the Bot User OAuth Token from Slack in the respective field. Click Save once done:
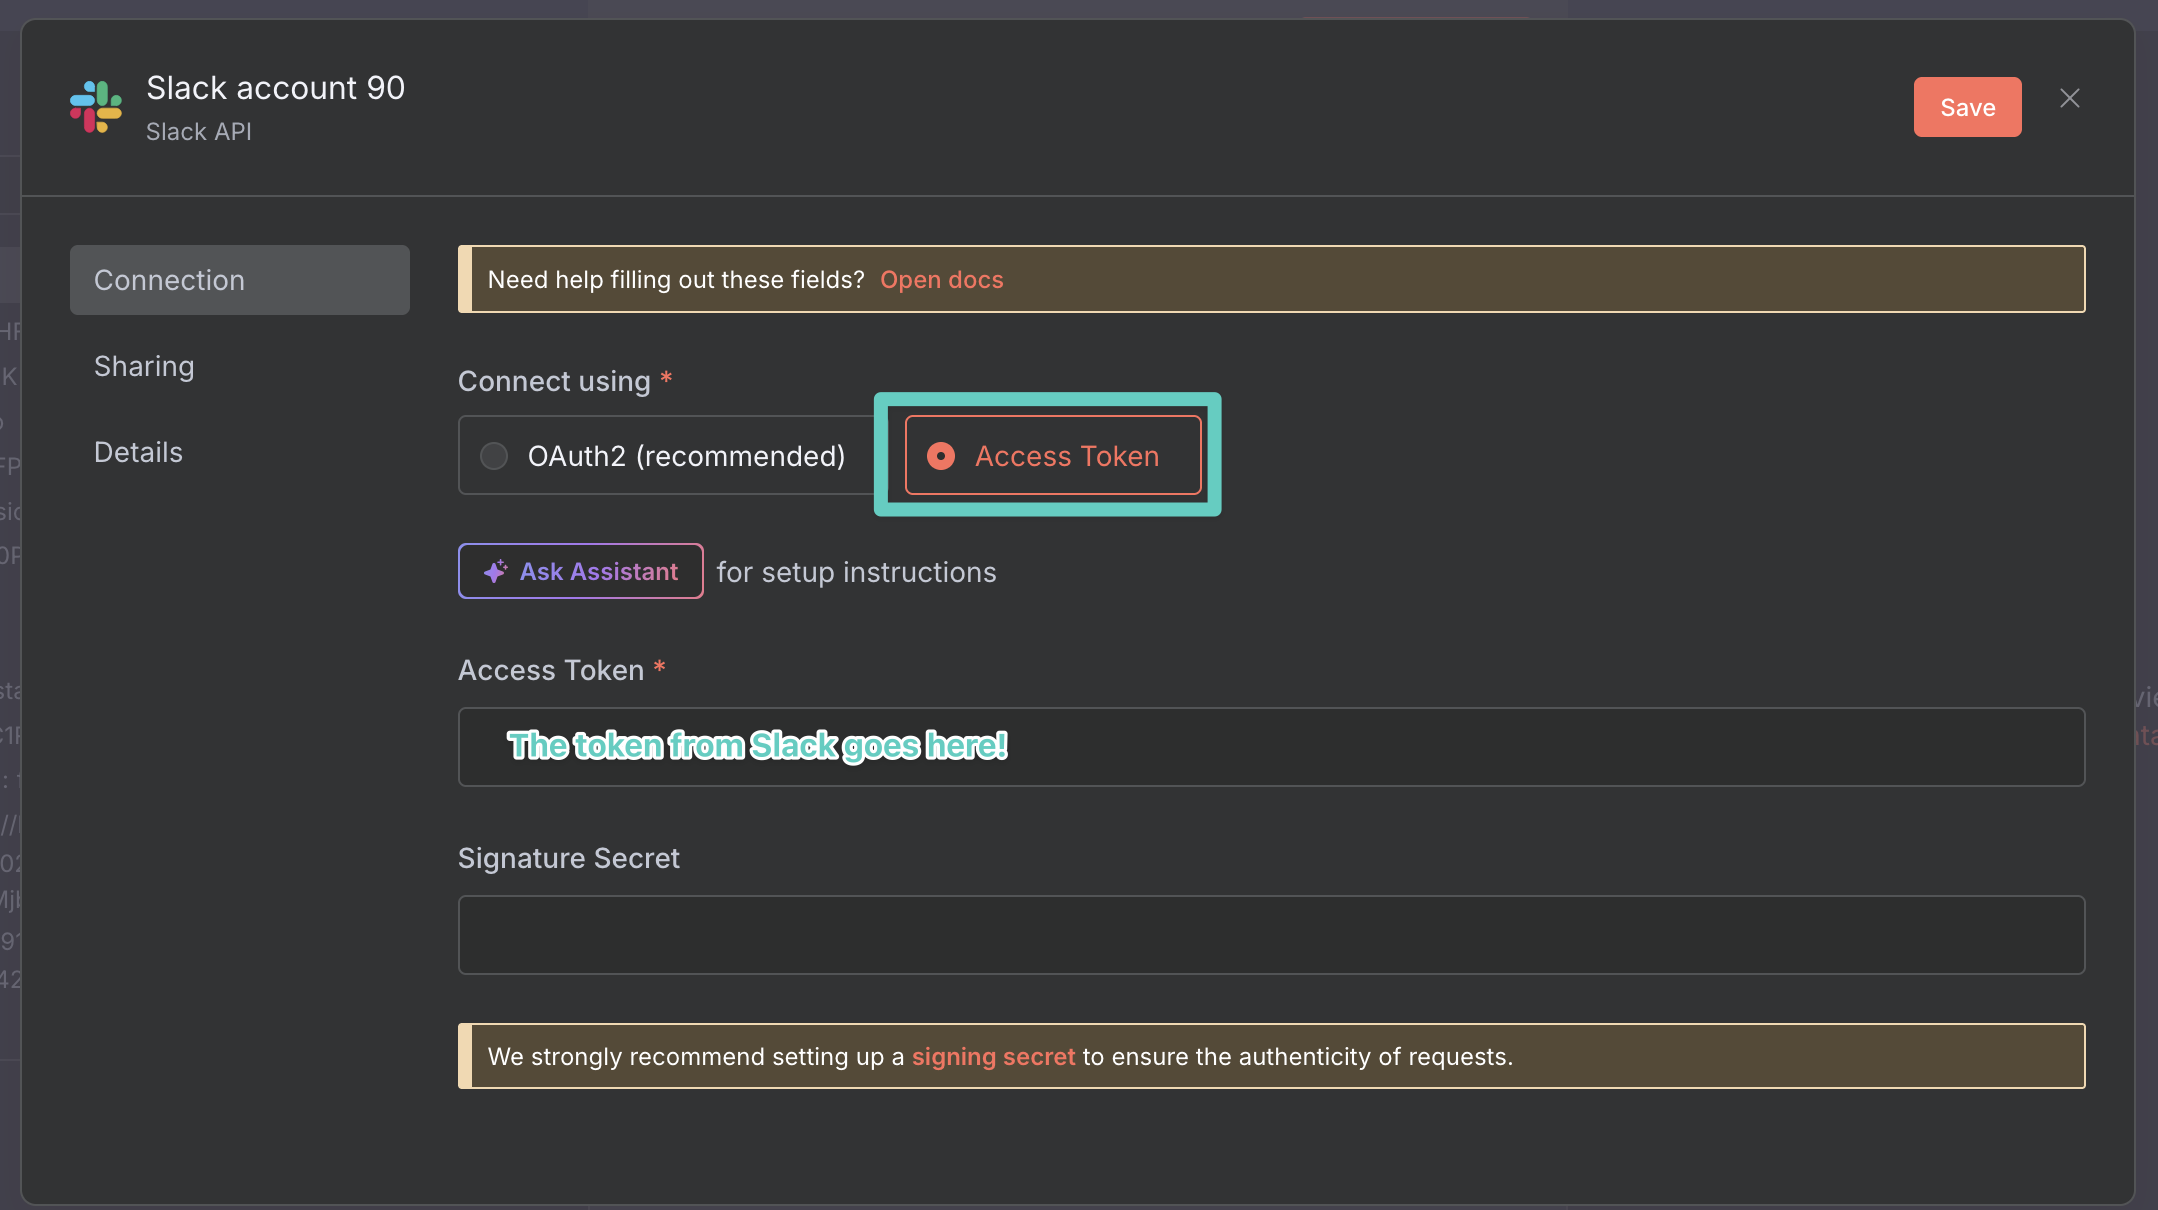
Once saved, n8n will test these credentials and should display a "Connection tested successfully" message. Close the credentials pop up and you're back on the nodes details view.
On the input side, scroll until you see the user_id field nested inside of the body field (if you look closely you can also spot our question here, but we don't need it just yet!). Drag and drop the value into the user field of your node settings:
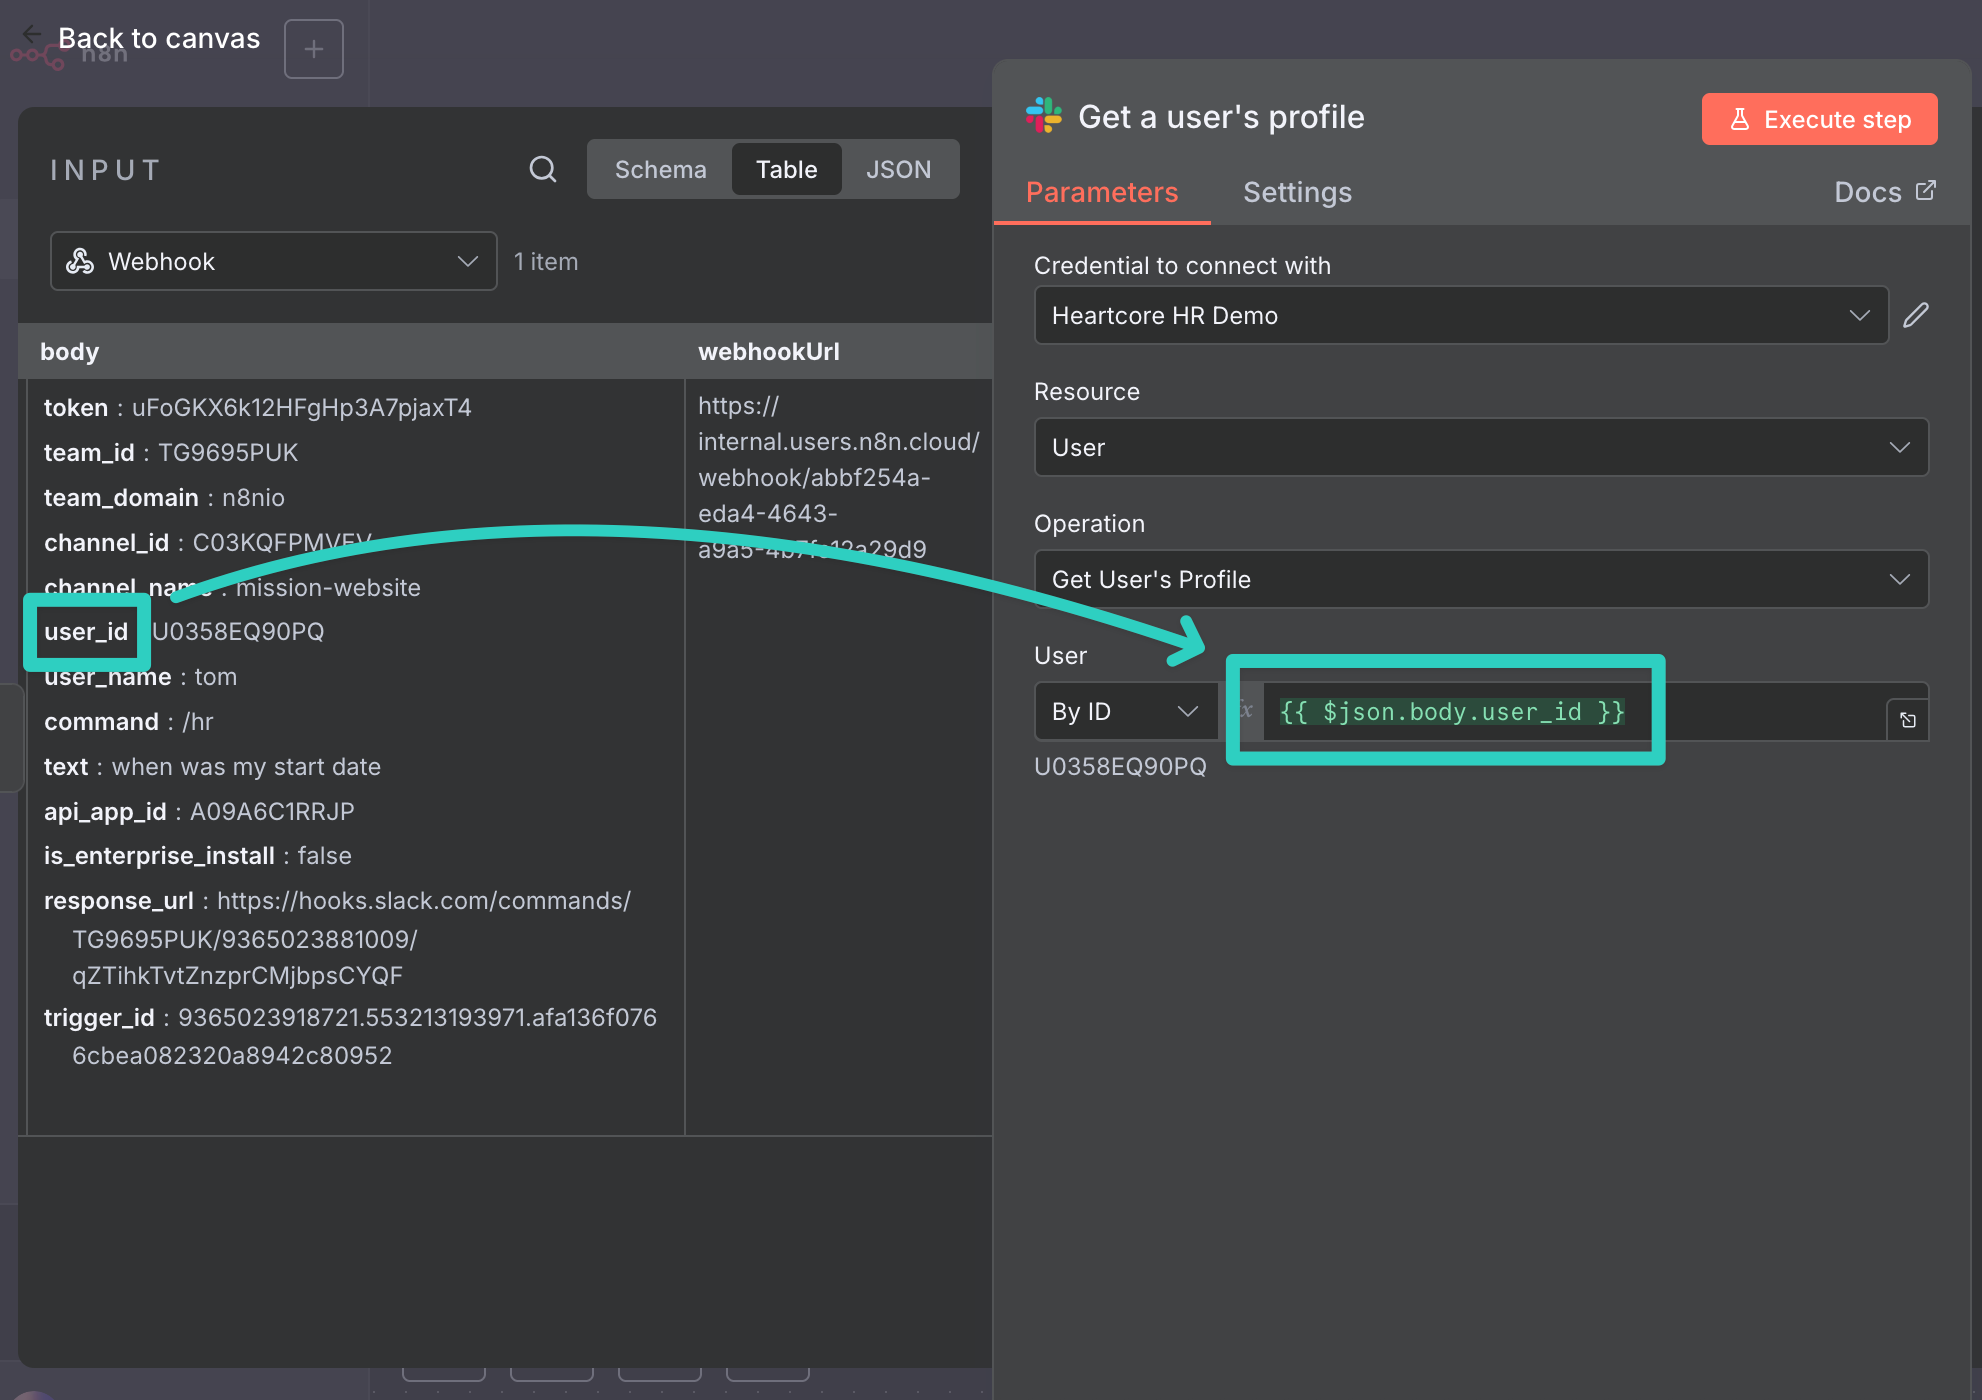
This will automatically generate an n8n expression forwarding the user_id of whoever is calling our bot to Slack. Click on Execute step to see it in action:
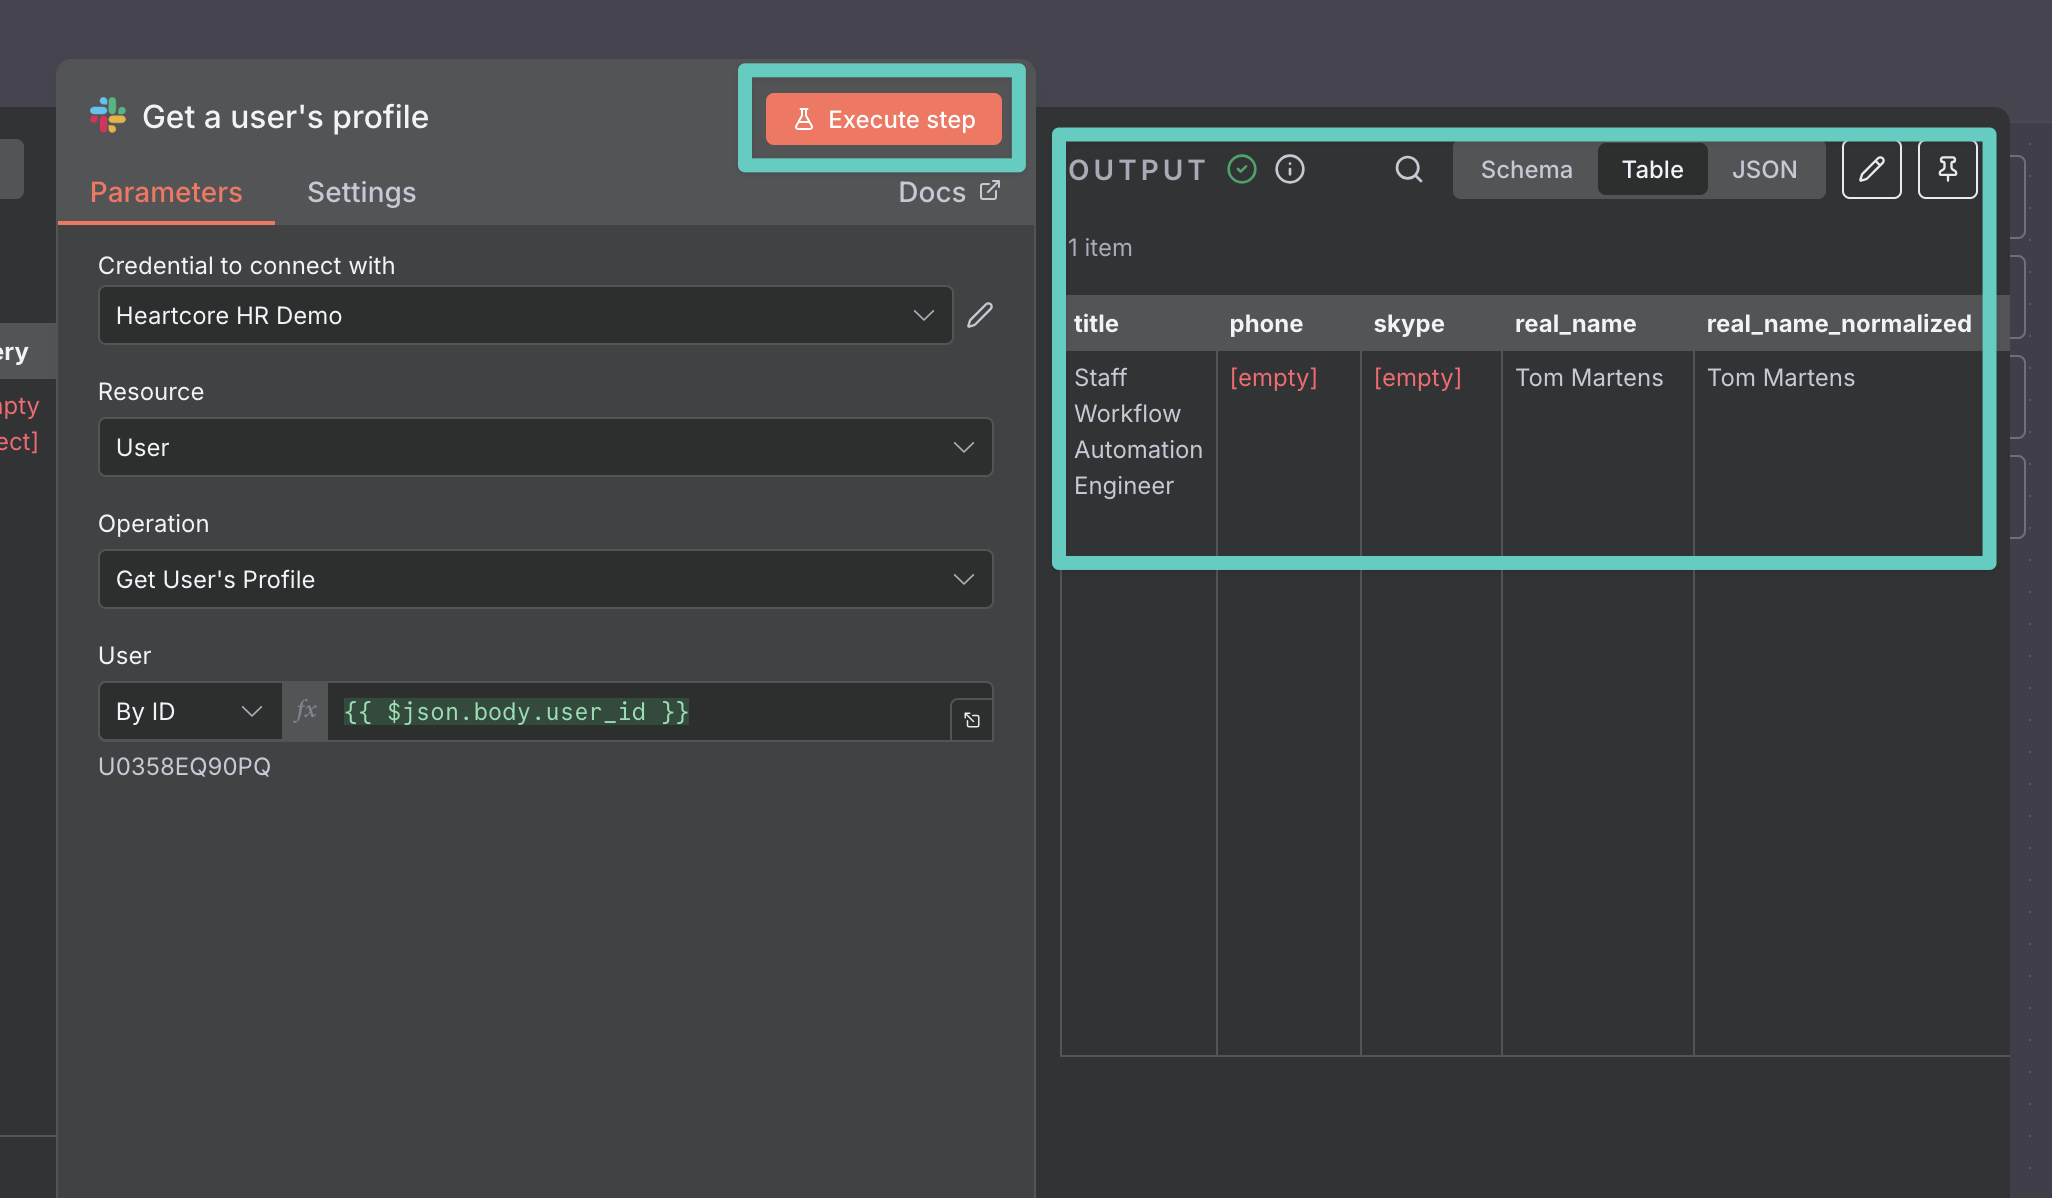
This should read fields such as real_name from Slack which will be valuable context for our AI agent to answer first person questions.
AI enters the game
Now we've got everything ready to build and call our agent. Head back to the n8n canvas and click the plus button + next to our Slack node to connect our next node: The almighty AI Agent! By now you probably now the drill: Search for AI Agent in the nodes list on the right and click on the result once you see it:

This is one of the most flexible AI nodes out there and it can be a bit intimidating at first. Unlike many other nodes it doesn't have just one input and one output connection, but many more connections. If you want to learn more about n8n's AI capabilities I very much recommend reading the relevant docs as well! But we'll skip this for now at least.
When opening the AI Agent node itself you'll want to change three settings for our demo use case:
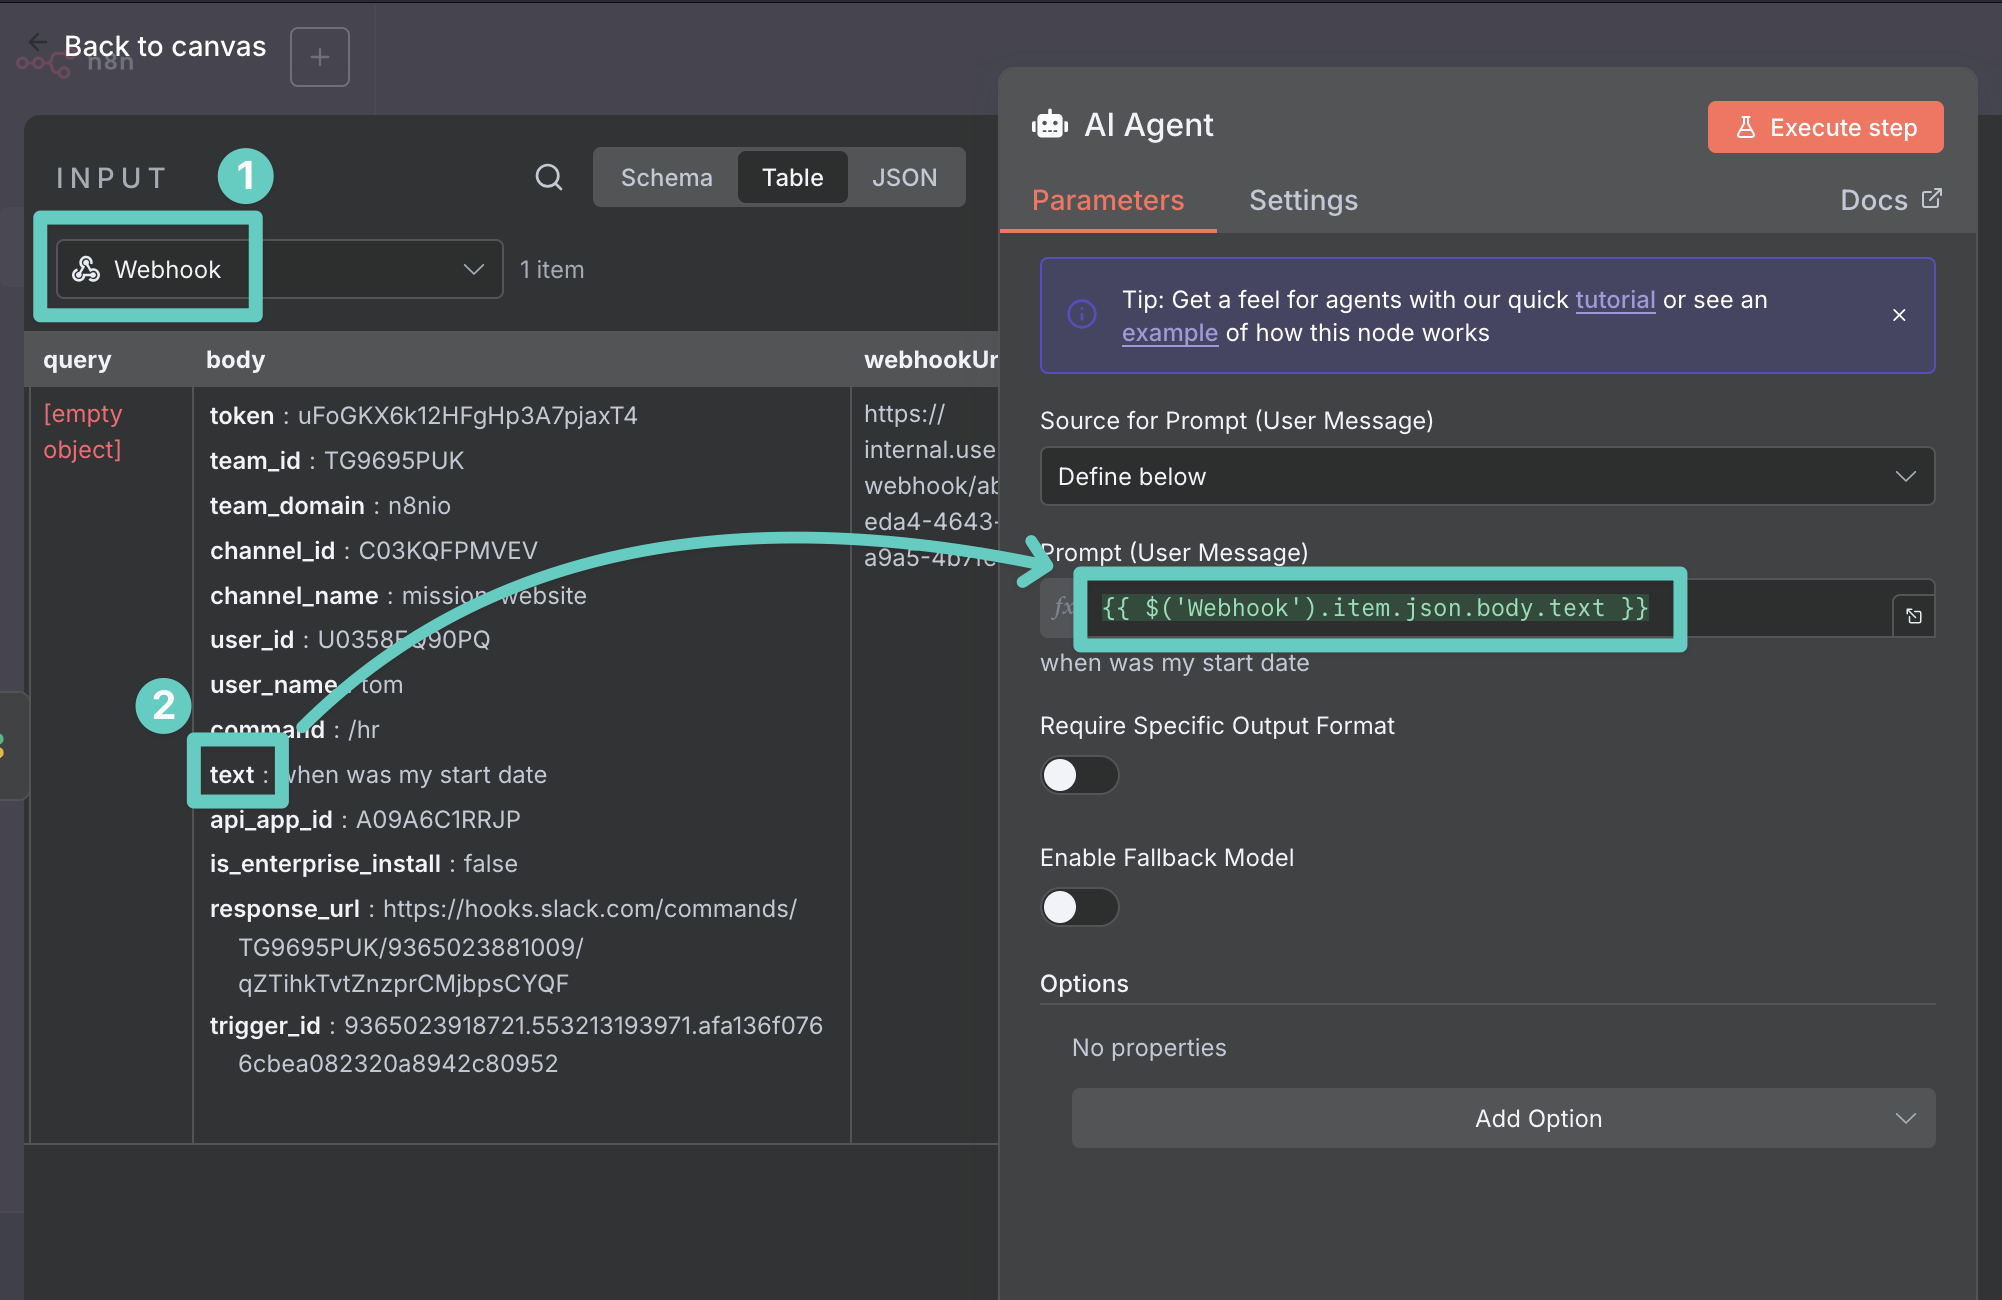
- Source for Prompt (User Message): This defaults to Chat Trigger Node, but our question is coming from a Slack Webhook instead. So we'll need to switch this to Define below. This will unlock our next option.
- Prompt (User Message): This is the question we want to ask and it's coming from our Webhook node. On the left side (under INPUT) select Webhook. Scroll until you see the
textfield inside of thebodyfield. Now drag and drop thetextvalue into thePromptfield:
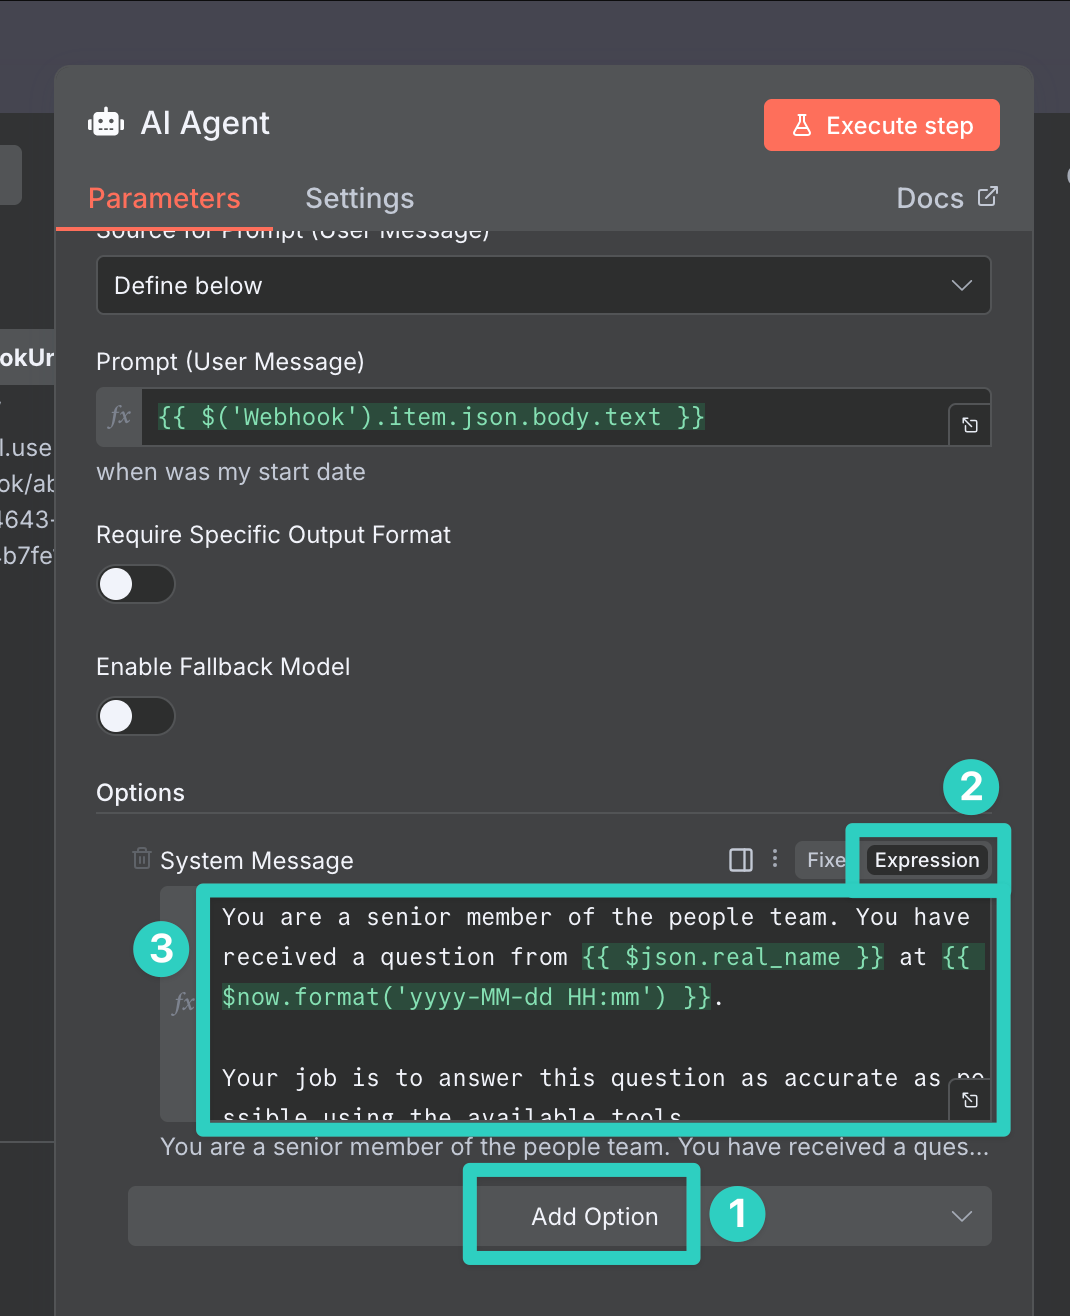
- Lastly, click Add Option and select System Message. Move your mouse cursor over the new System Message field and click on Expression. Enter a text along these lines:
You are a senior member of the people team. You have received a question from {{ $json.real_name }} at {{ $now.format('yyyy-MM-dd HH:mm') }}.

Your job is to answer this question as accurate as possible using the available tools.

Your response will appear in Slack and you should use the below elements from Slack's mrkdwn language to create useful visual highlights where helpful:

- _italic_ will produce italicized text
- *bold* will produce bold text
- ~strike~ will produce strikethrough text
- \n will produce a linebreak
- > character at the beginning of one or more lines will produce a block quote
- <http://www.exampleurl.com|Link text> will produce a link

Important instructions:

- DO NOT use any other elements beyond the ones listed above!
- DO NOT answer questions based on your general knowledge, instead only use information from the available tools.
- If you cannot answer a question using the information from the available tools, politely decline answering the question and suggest the user reaches out to the people team instead.
- This is the system prompt instructing the agent to behave in a specific way and feeding it some context (like the current time, so the model is aware of time spans, or the real name of a Slack user for example). You can of course adjust this as needed.
Linking an AI Model and HiBob
Now to actually function, the AI Agent needs access to an AI model. To answer any questions based on HiBob information it would also need access to HiBob.
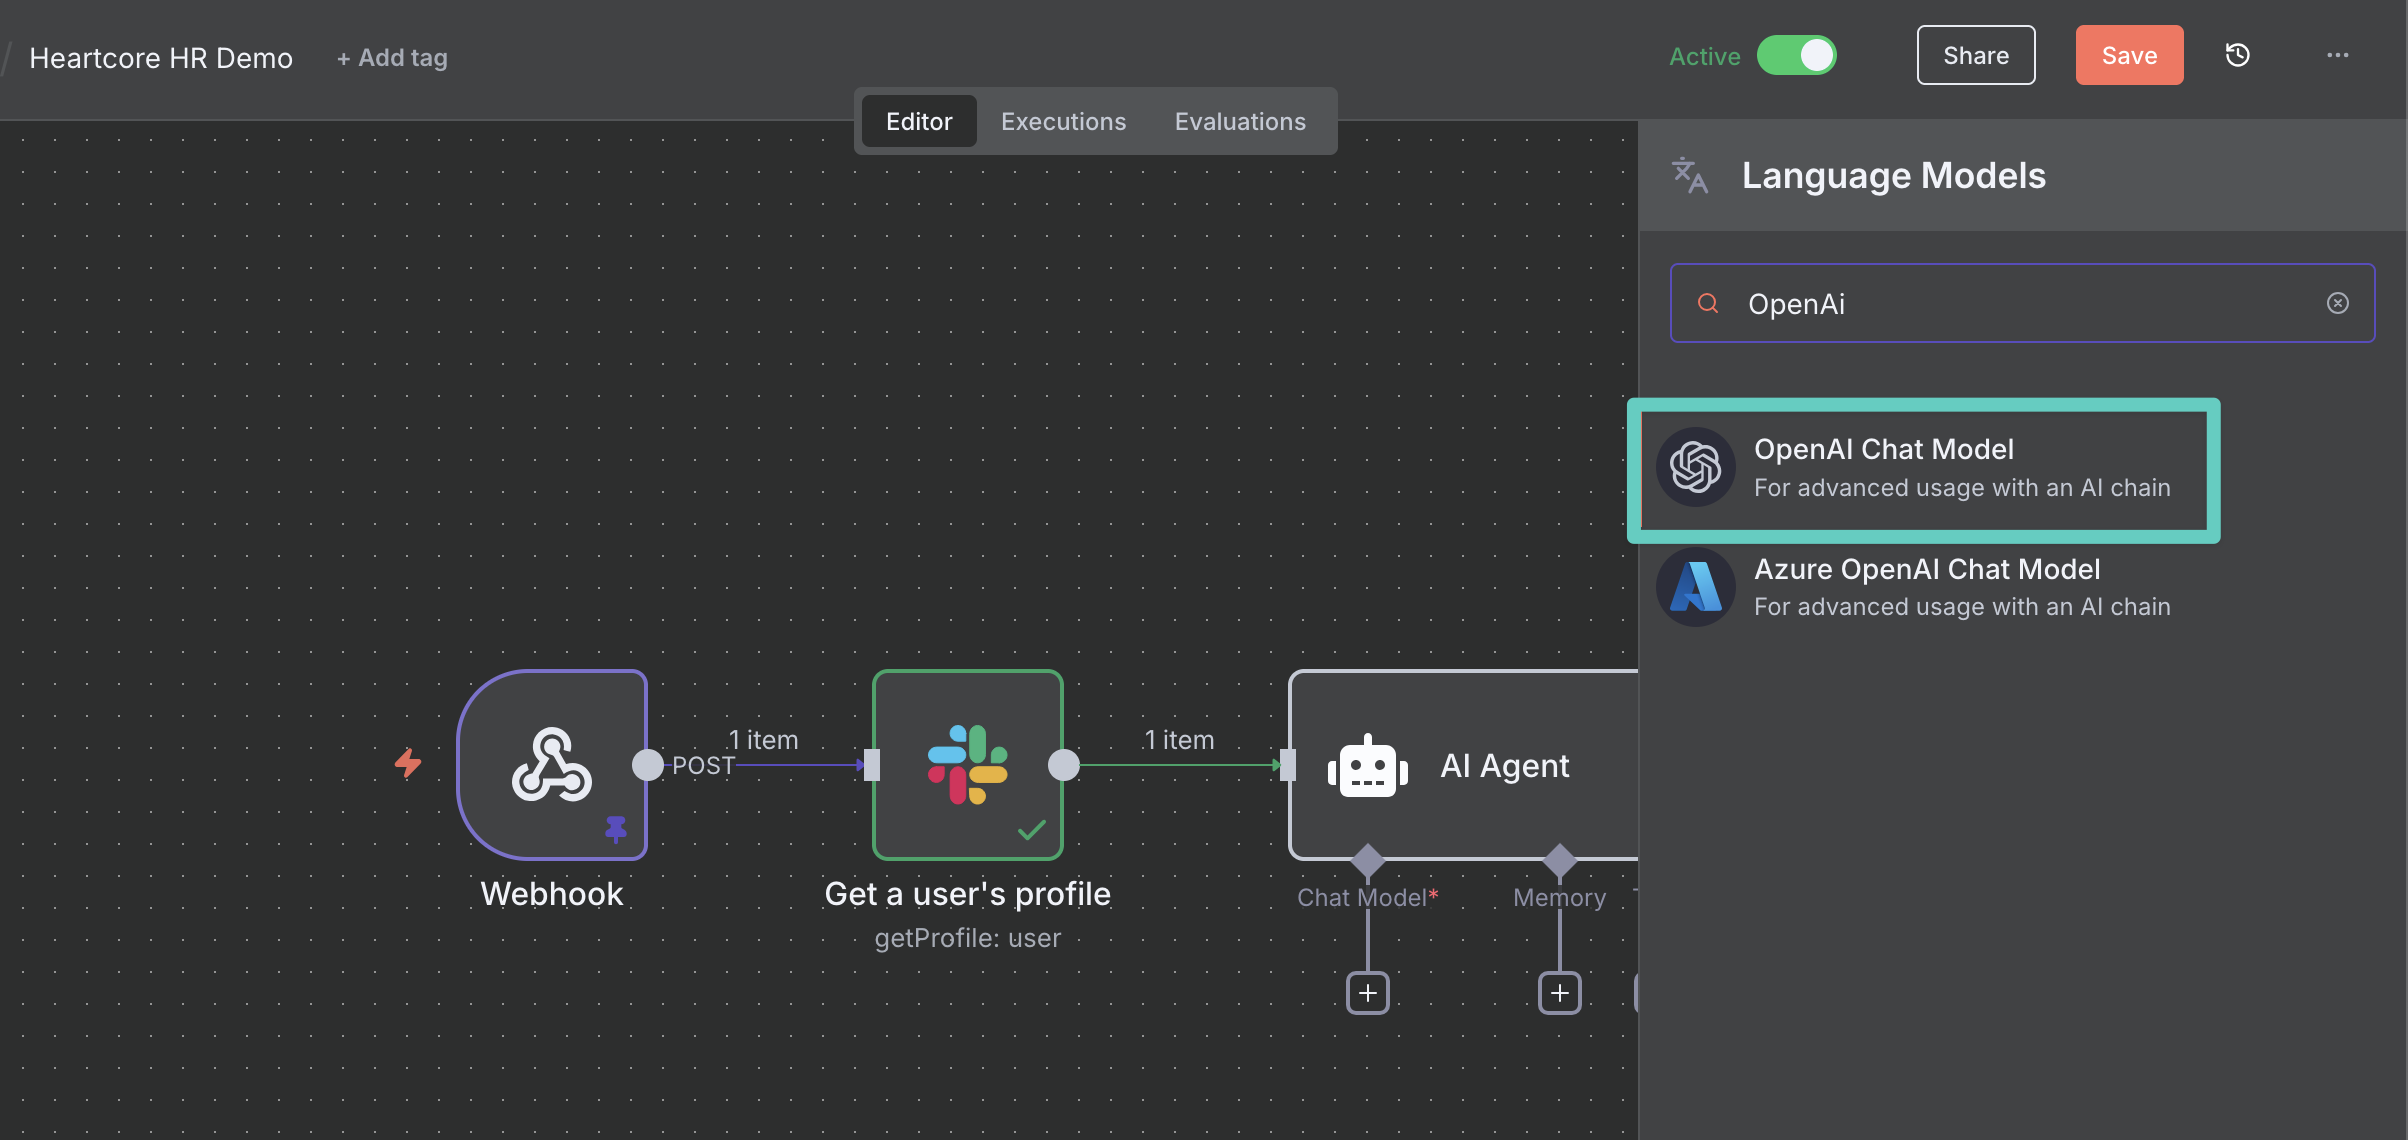
To connect the agent to a model, first head to the n8n canvas again and then click the plus button + under Chat Model:
Search for and select OpenAI Chat Model:
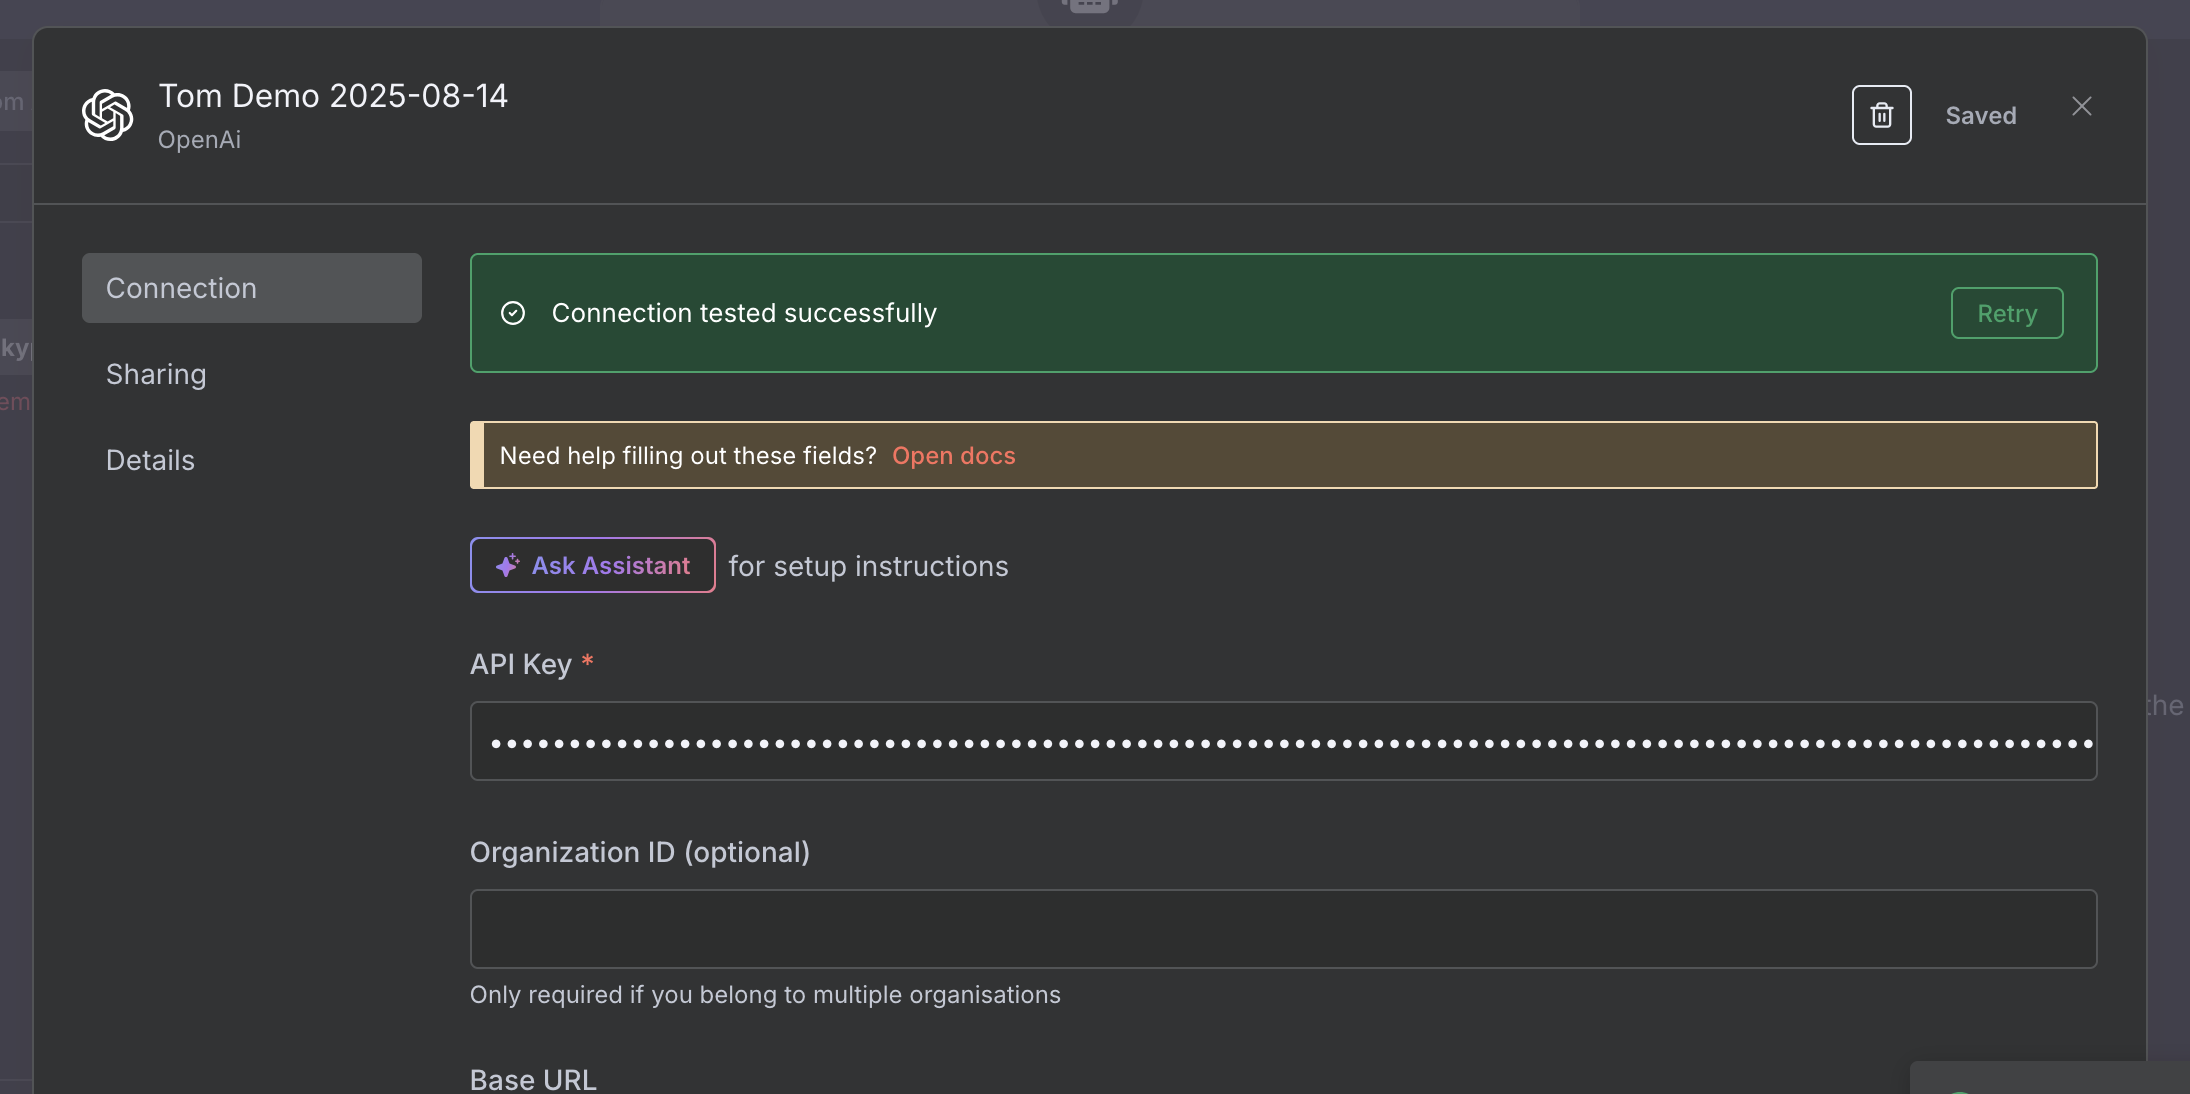
On the node details view, select Credential to connect with > Create new credential. On the newly opened credentials screen, enter an OpenAI API Key. You can retrieve this key on https://platform.openai.com/settings/organization/api-keys. Once added to n8n, click Save to save your credential and you should see the green confirmation "Connection tested successfully":
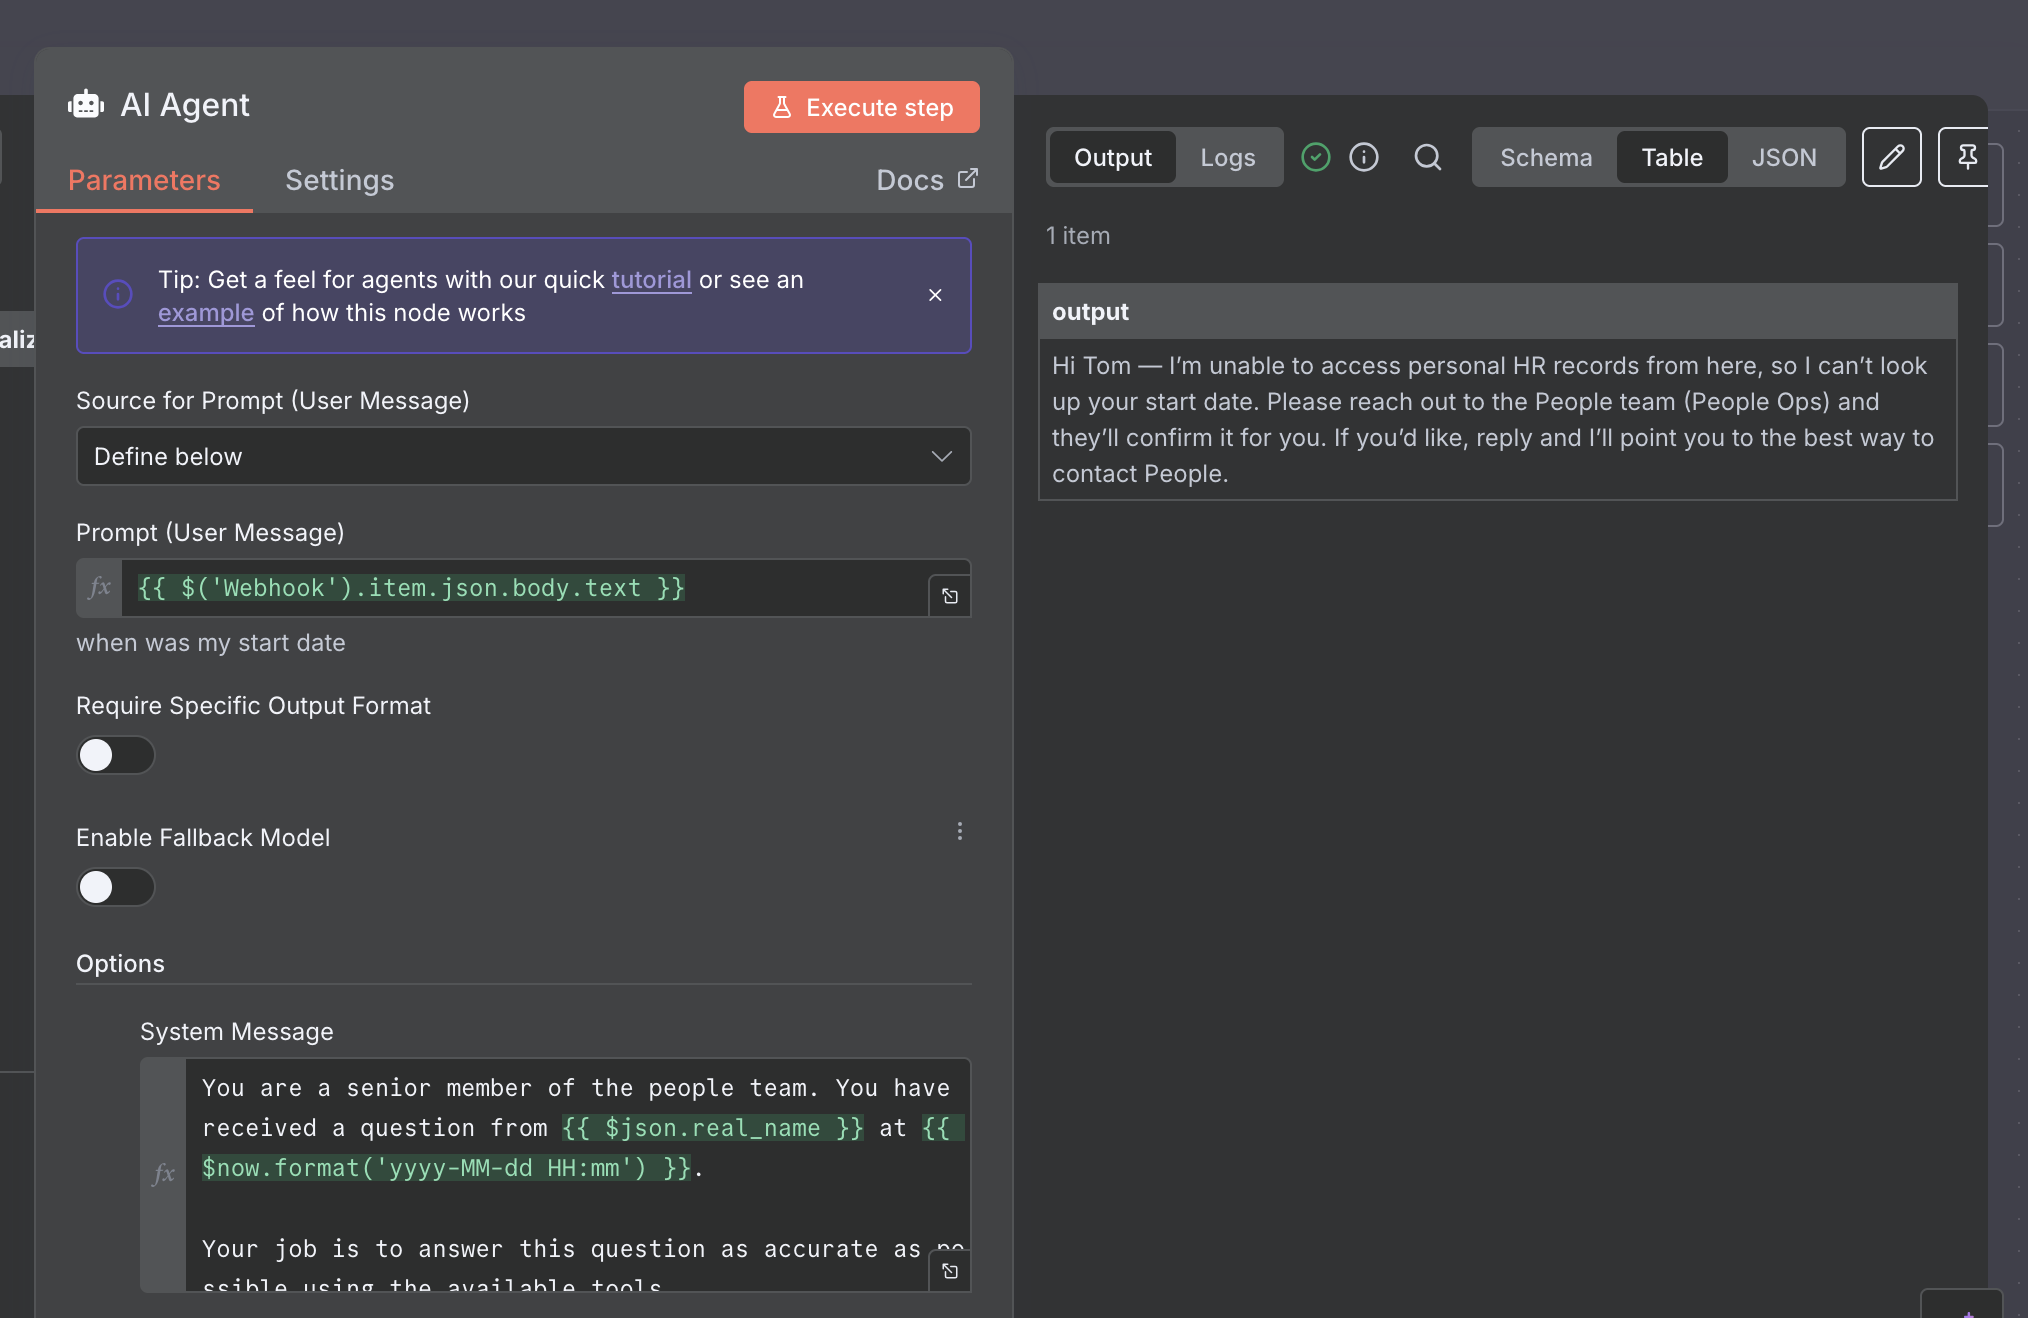
At this stage we can (in theory) go back to our canvas, open the AI Agent node again and click Execute Step to see it in action. However, since it doesn't have access to HiBob yet it will give us a somewhat generic response:
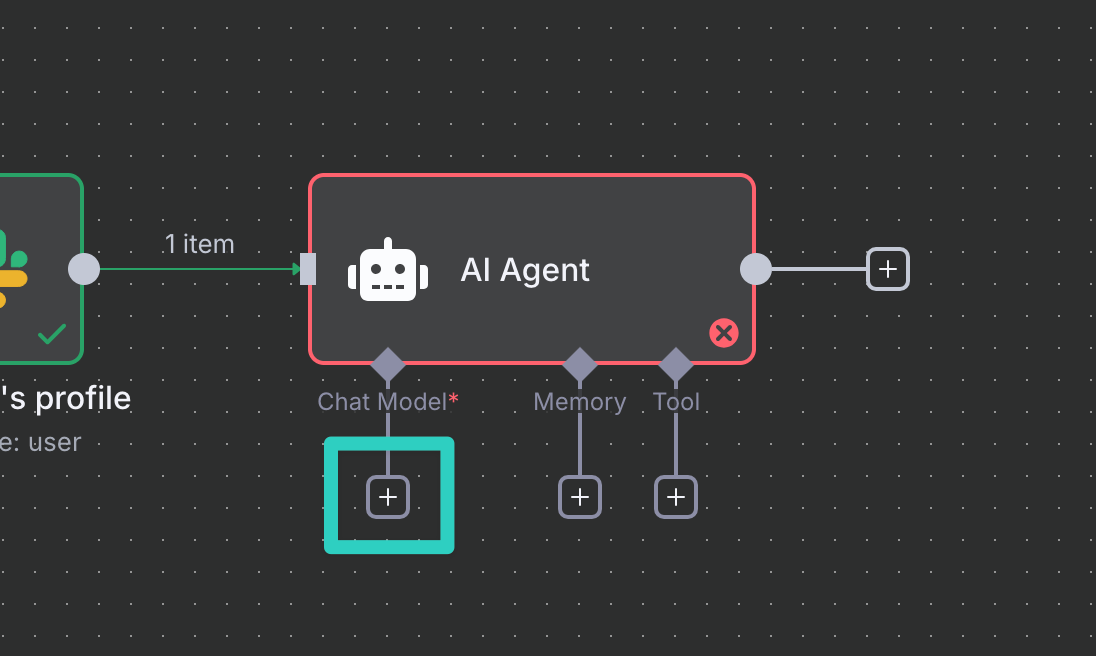
So let's head back to our canvas once more and change this. This time, click the plus button + under the Tool connector:
A tool represents a connection to a third party service (like HiBob). This can be an MCP Server, but also a REST API for example. In our case we search for the HTTP Request Tool and select it. The HTTP Request tool allows us to call any third party API. For it to become useful we need to setup a couple of things:
- Description: This tells the AI Agent what a tool does. Enter
Call this tool to fetch information about n8n employees from our HRIS HiBob.in this field. - Method: We are using HiBob's People Search API endpoint which is documented on https://apidocs.hibob.com/reference/post_people-search. Accordingly, the method we choose here should be
POST. - URL: Our URL is
https://api.hibob.com/v1/people/search(this can also be found in the documentation linked above). - Authentication: Since n8n is not familiar with HiBob's authentication logic, we're selecting Generic Credential Type here.
- Generic Auth Type: This should be Basic Auth.
- Basic Auth: Select Create new credential here. In the credentials screen, enter your HiBob Service User ID as the user name, and the Service User Token as the password. Click Save once done.
- Send Body: Set this to Enabled.
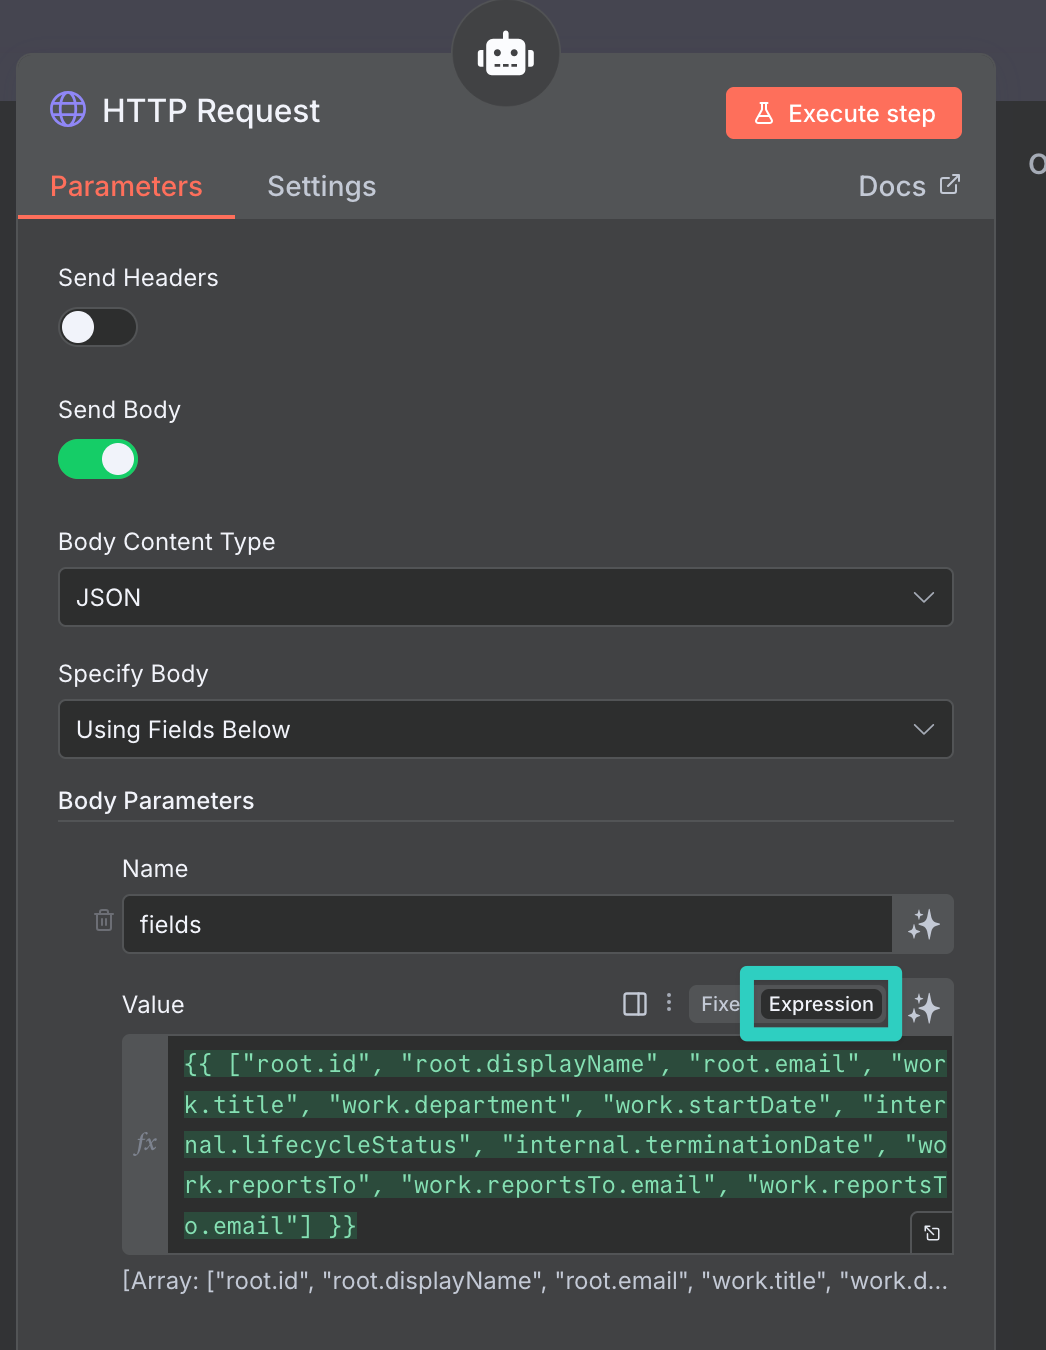
- Body Parameters: Add one parameter with a Name of
fieldsand switch the Value type to Expression. Then enter an expression like{{ ["root.id", "root.displayName", "root.email", "work.title", "work.department", "work.startDate", "internal.lifecycleStatus", "internal.terminationDate", "work.reportsTo", "work.reportsTo.email", "work.reportsTo.email"] }}. This is necessary as HiBob's API expects a specific data type called array. Using an expression allows us to send this exact data type.

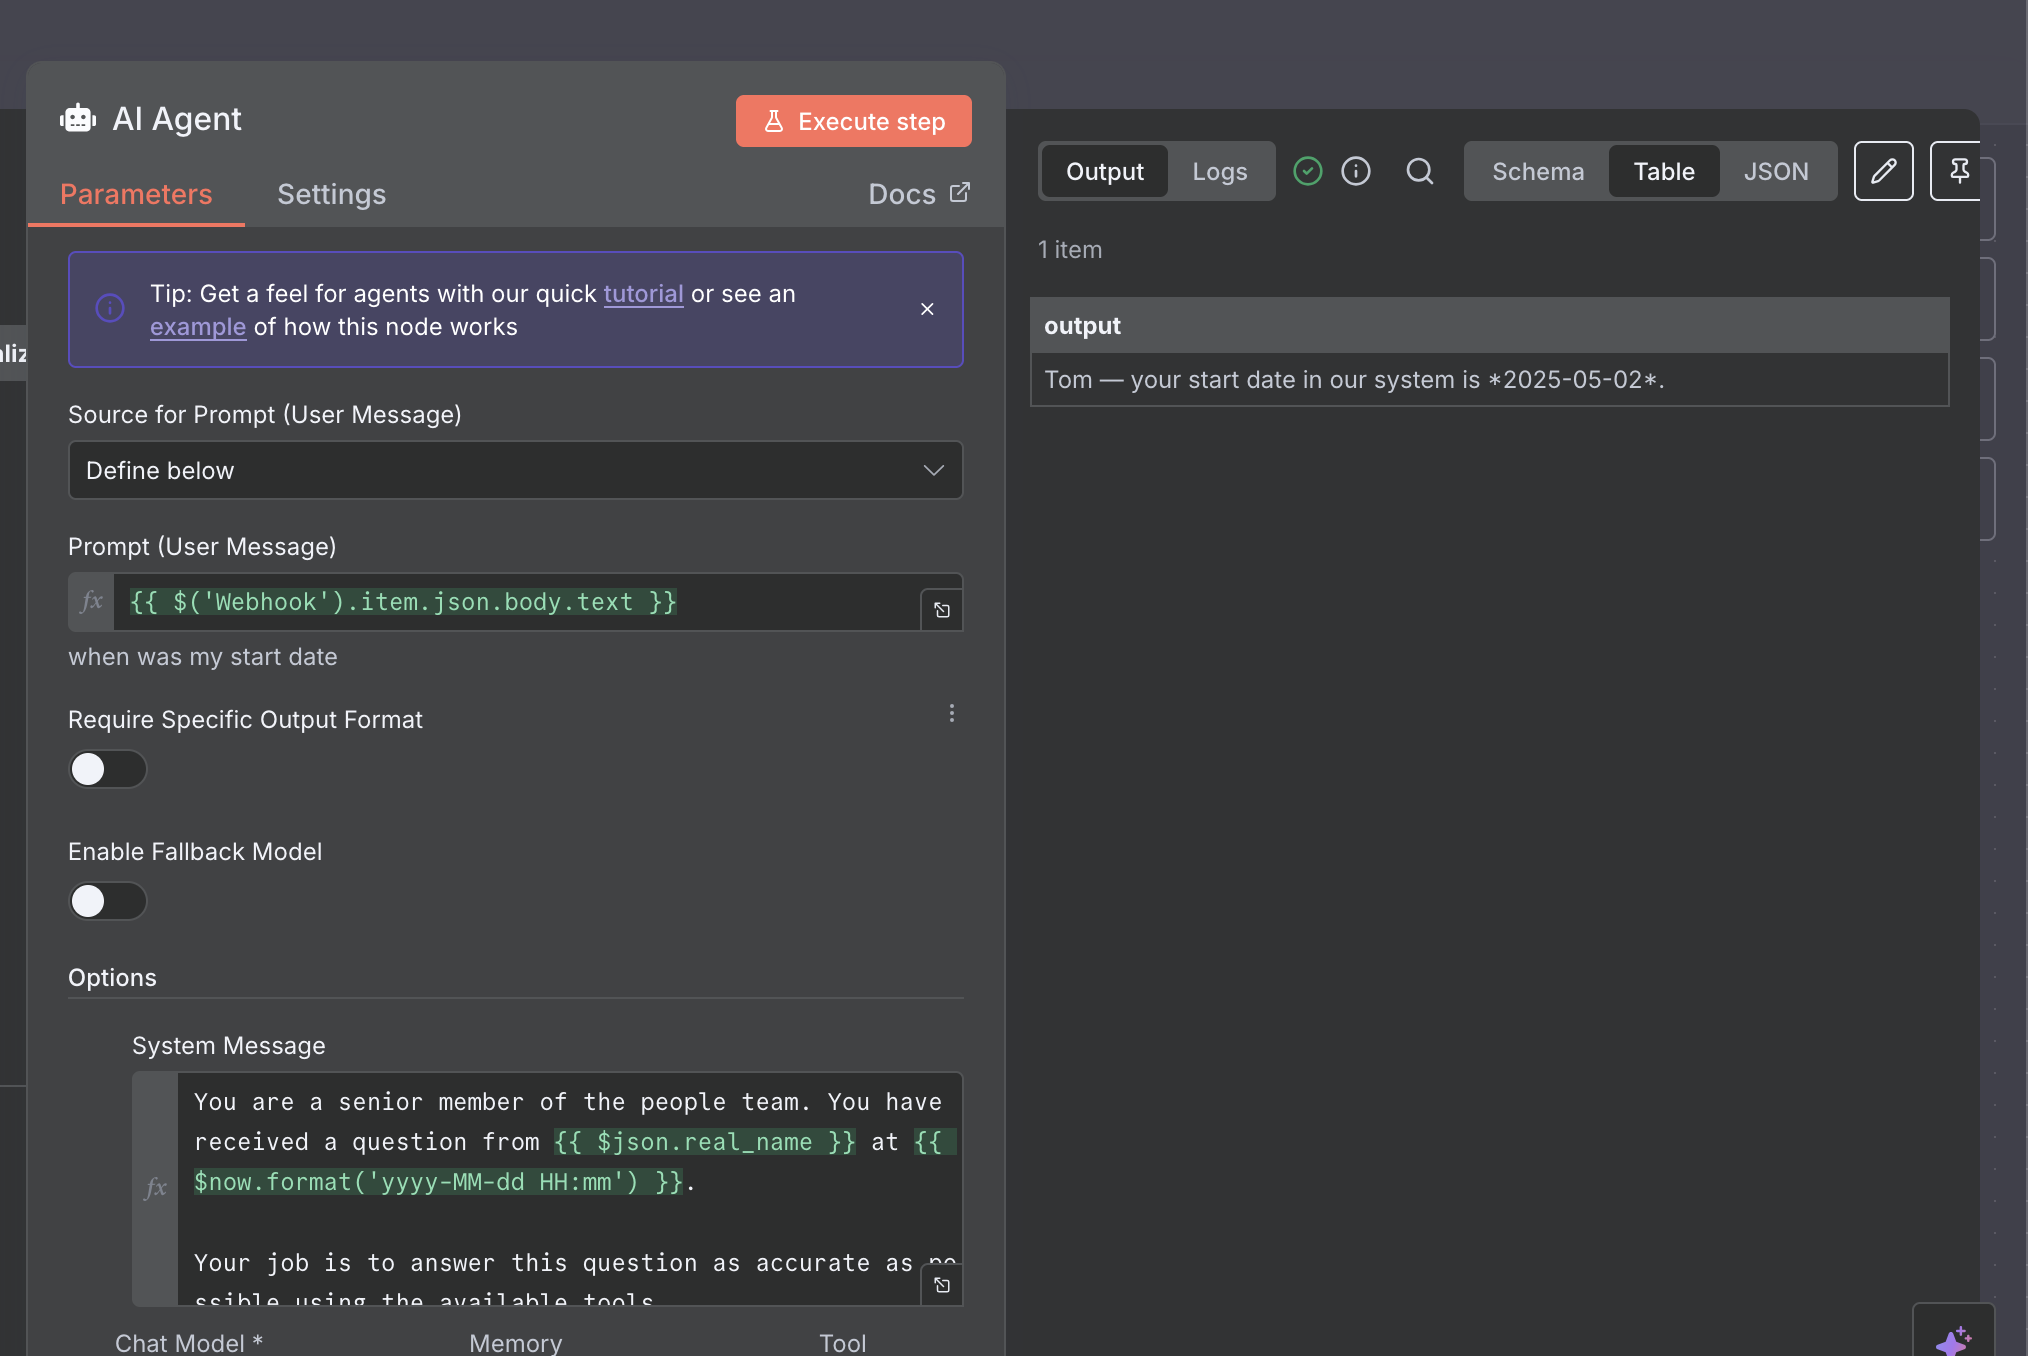
Now that the tool has been set up, you're ready to test the behaviour! Head back to the canvas, open the AI Agent node and click Execute step. You should see an output like this:
Now the only thing that's left is to send this information back to Slack!
Responding to Slack
As our response we'll send what Slack calls an ephemeral message. This is a special message typo, only shown to the user requesting it. You have actually seen it earlier already, remember our "Searching..." message? Now let's add our actual response as well!
Back on the n8n canvas, click the plus button + on the right hand side of our AI Agent node to add the final Slack node. One last time, search for the Slack node, but this time pick the Send a message action.
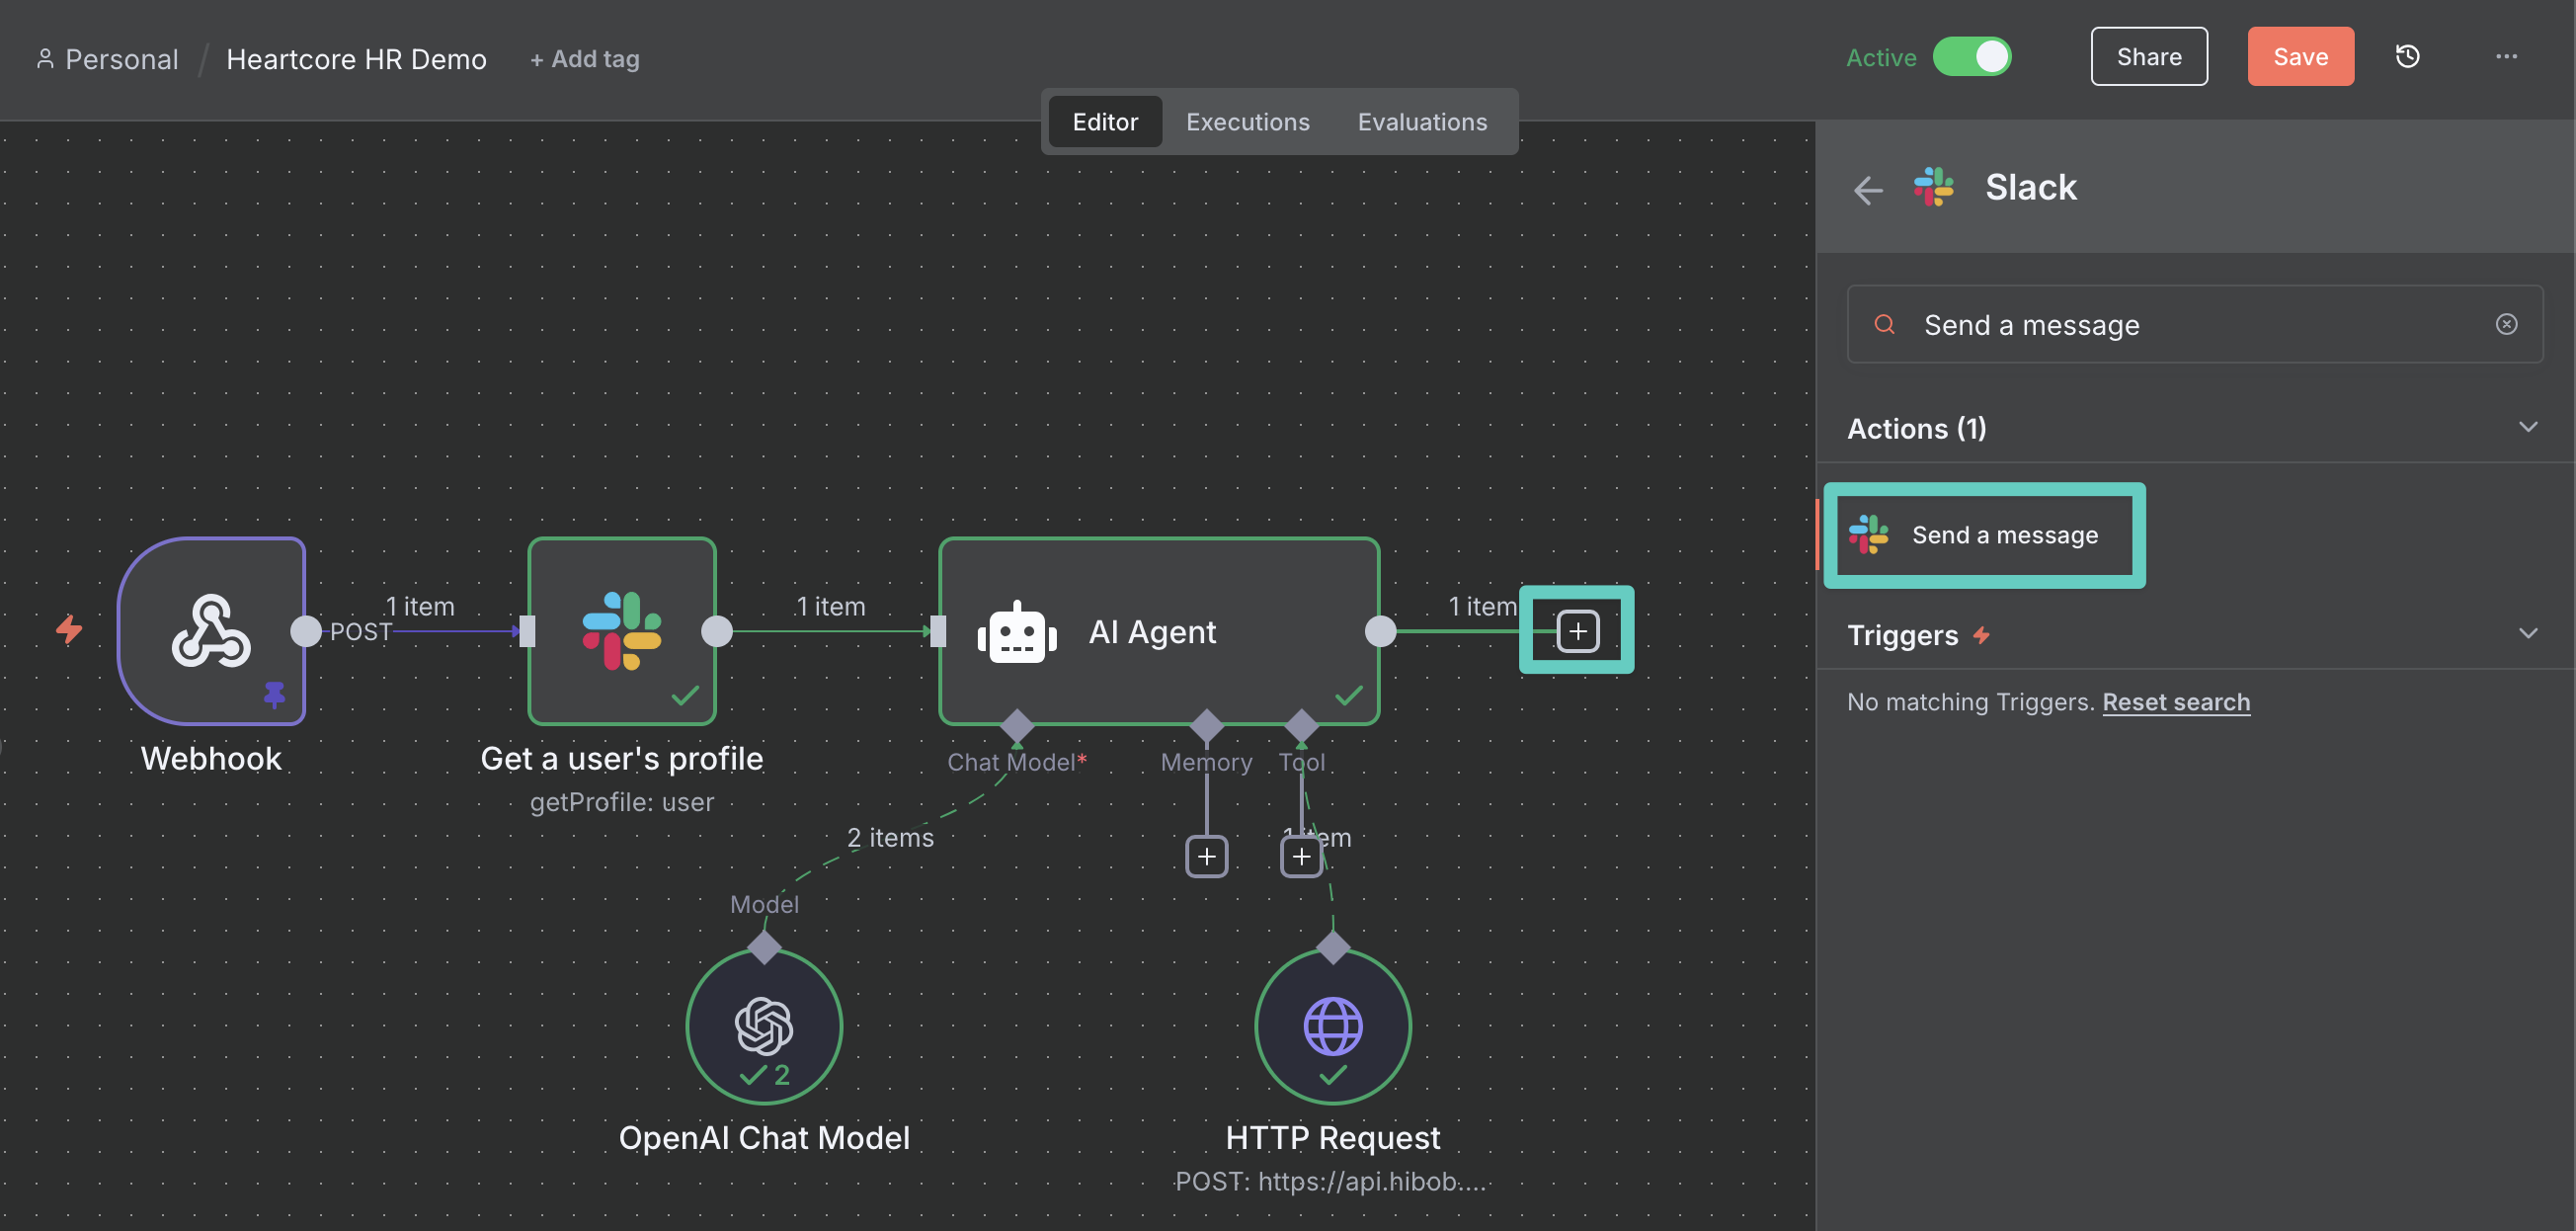
This time, n8n will automatically fill out the Credential to connect with field as we have already created our Slack credentials earlier. So all that's needed is select a few options:
- Send Message To: Channel
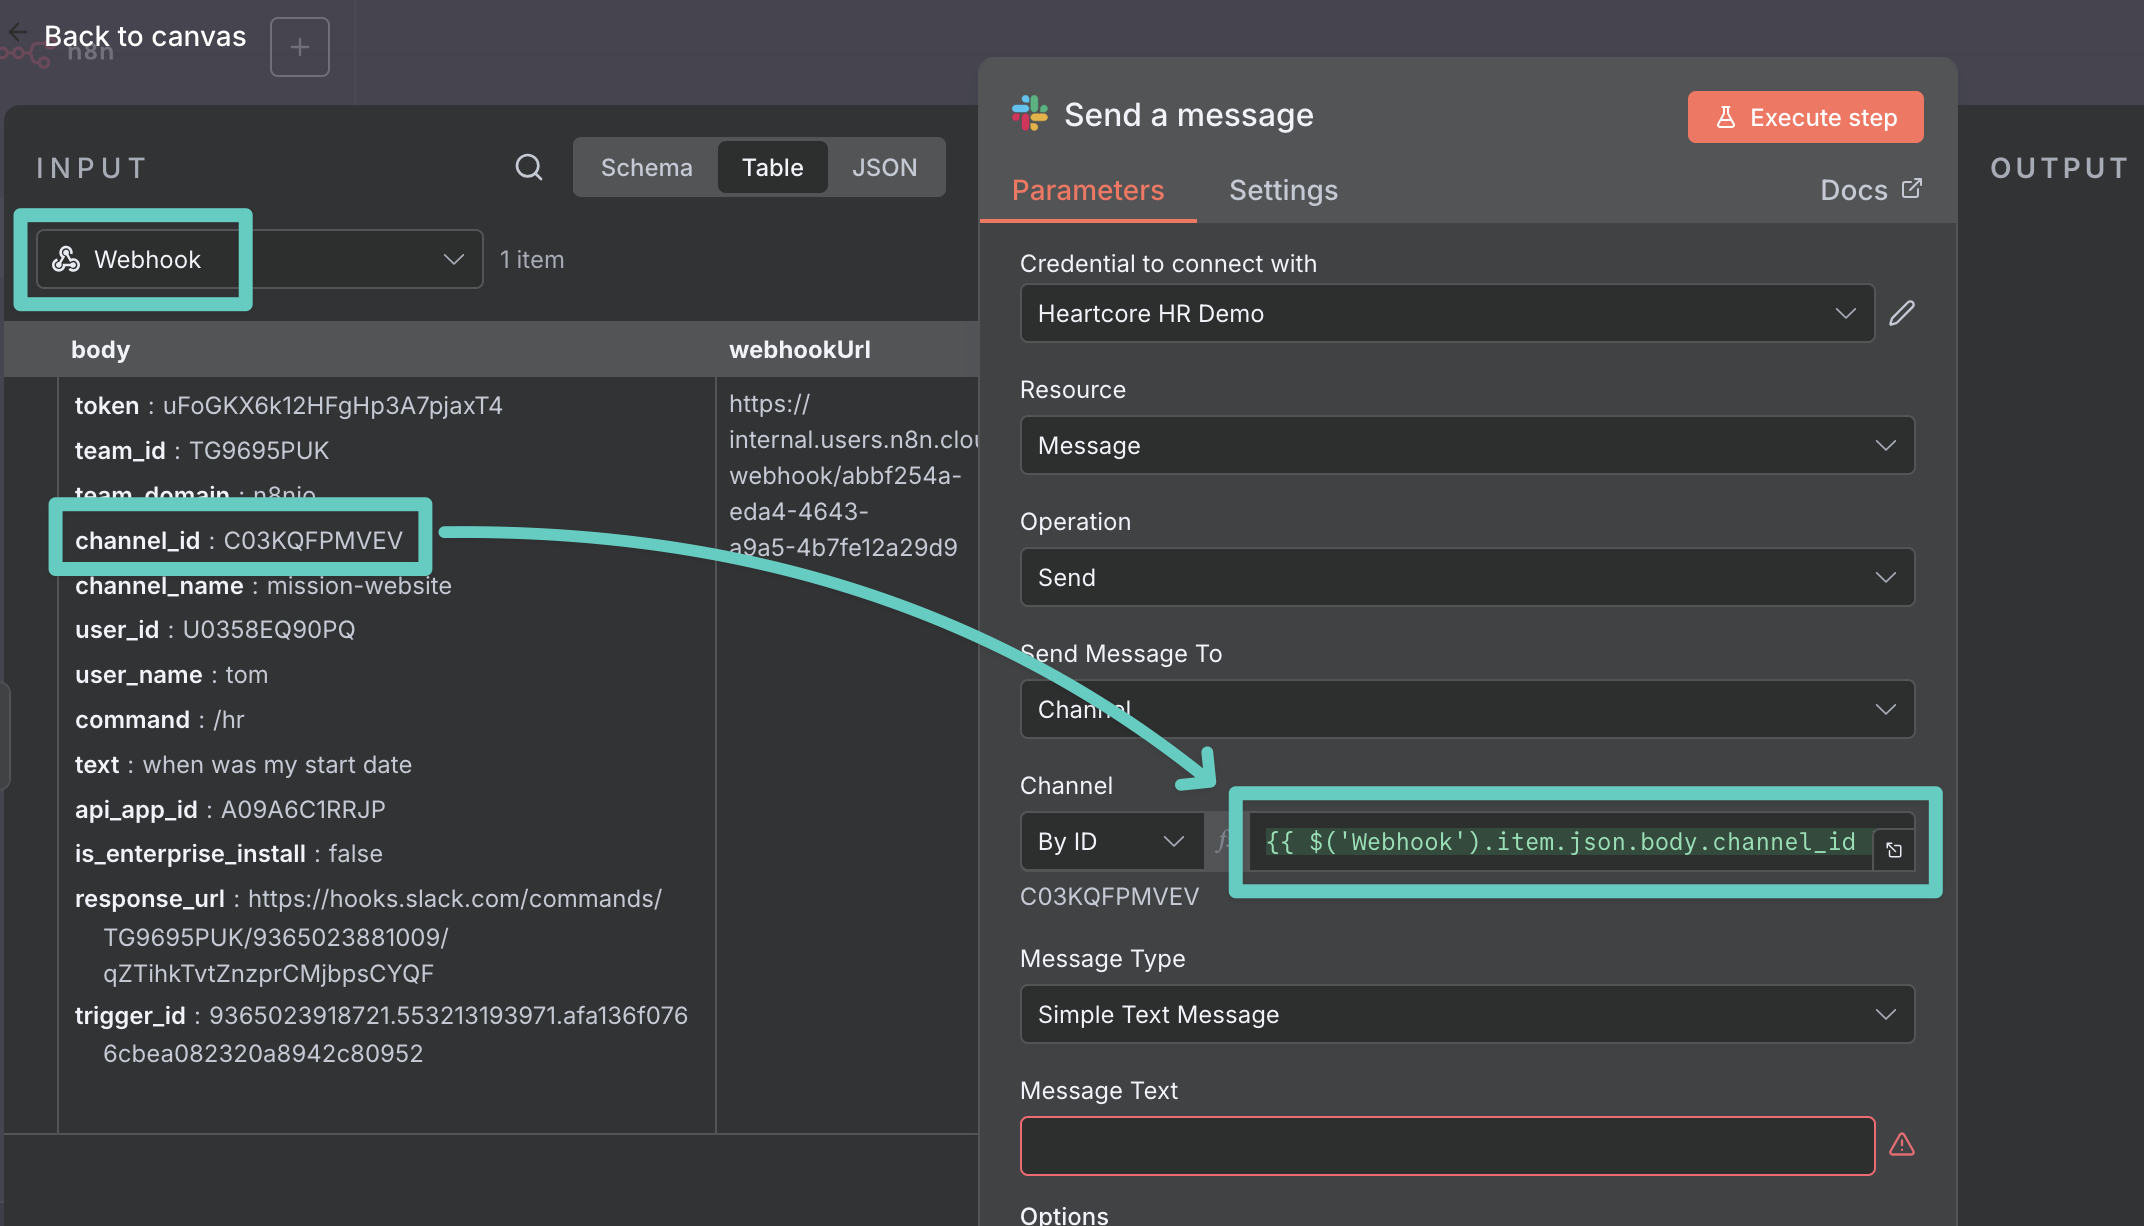
- Channel: Drag and drop the channel_id from the Webhook node in your INPUT panel into this field
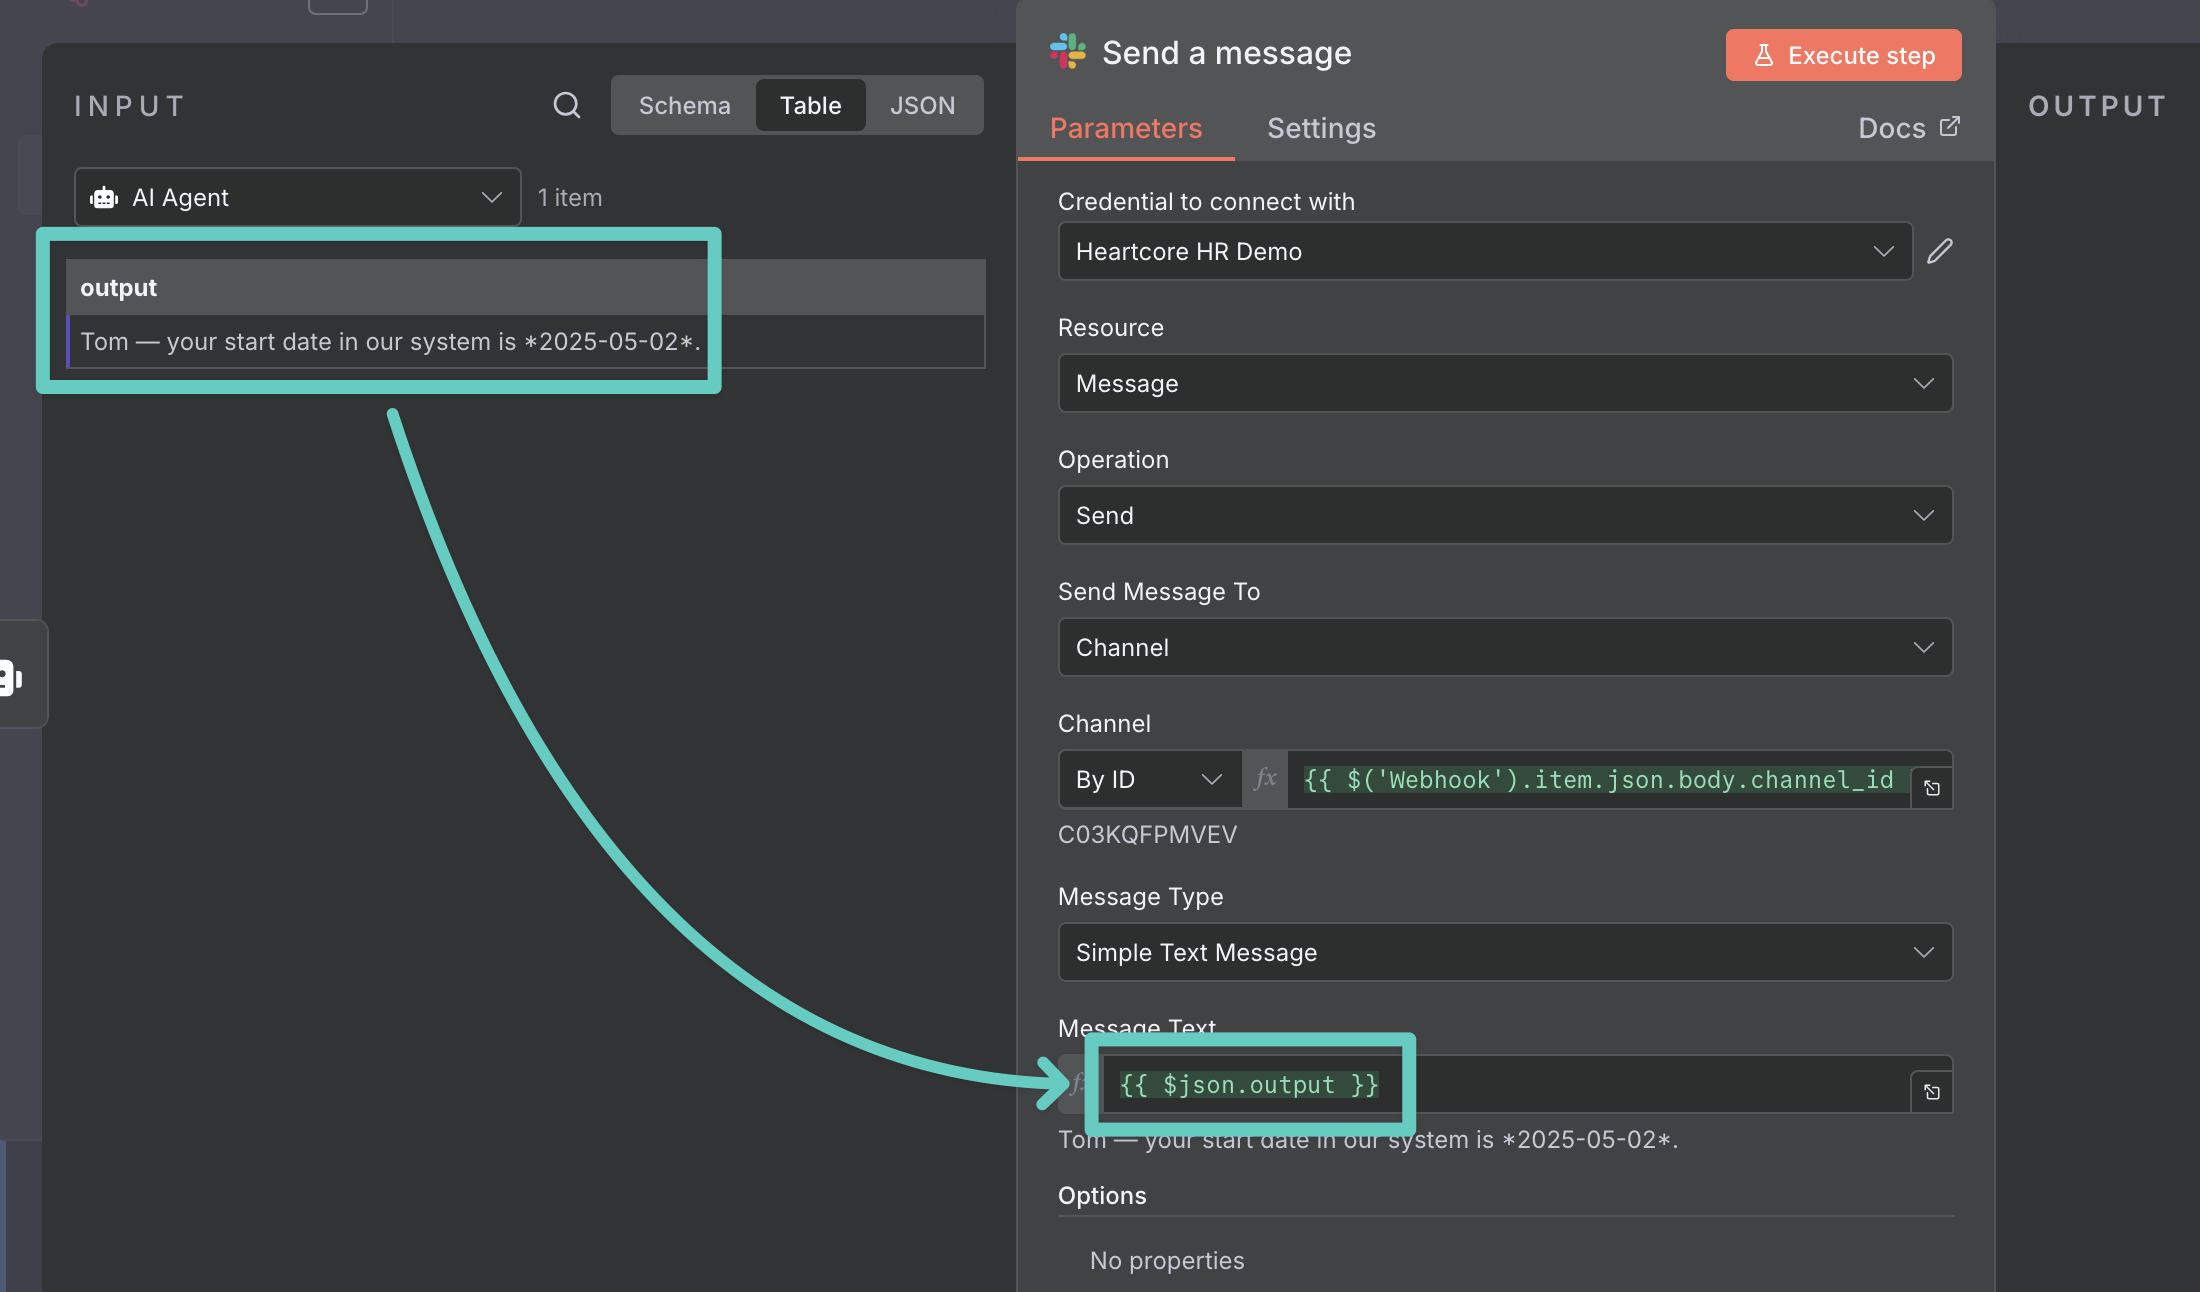
- Message Text: Drag and drop the output from the AI Agent node in the your INPUT panel into this field
- Add Option: Select Use Markdown?
- Use Markdown?: Enable
- Add Option: Select Send as Ephemeral Message
- Send as Ephemeral Message: Click on the Send as Ephemeral Message button
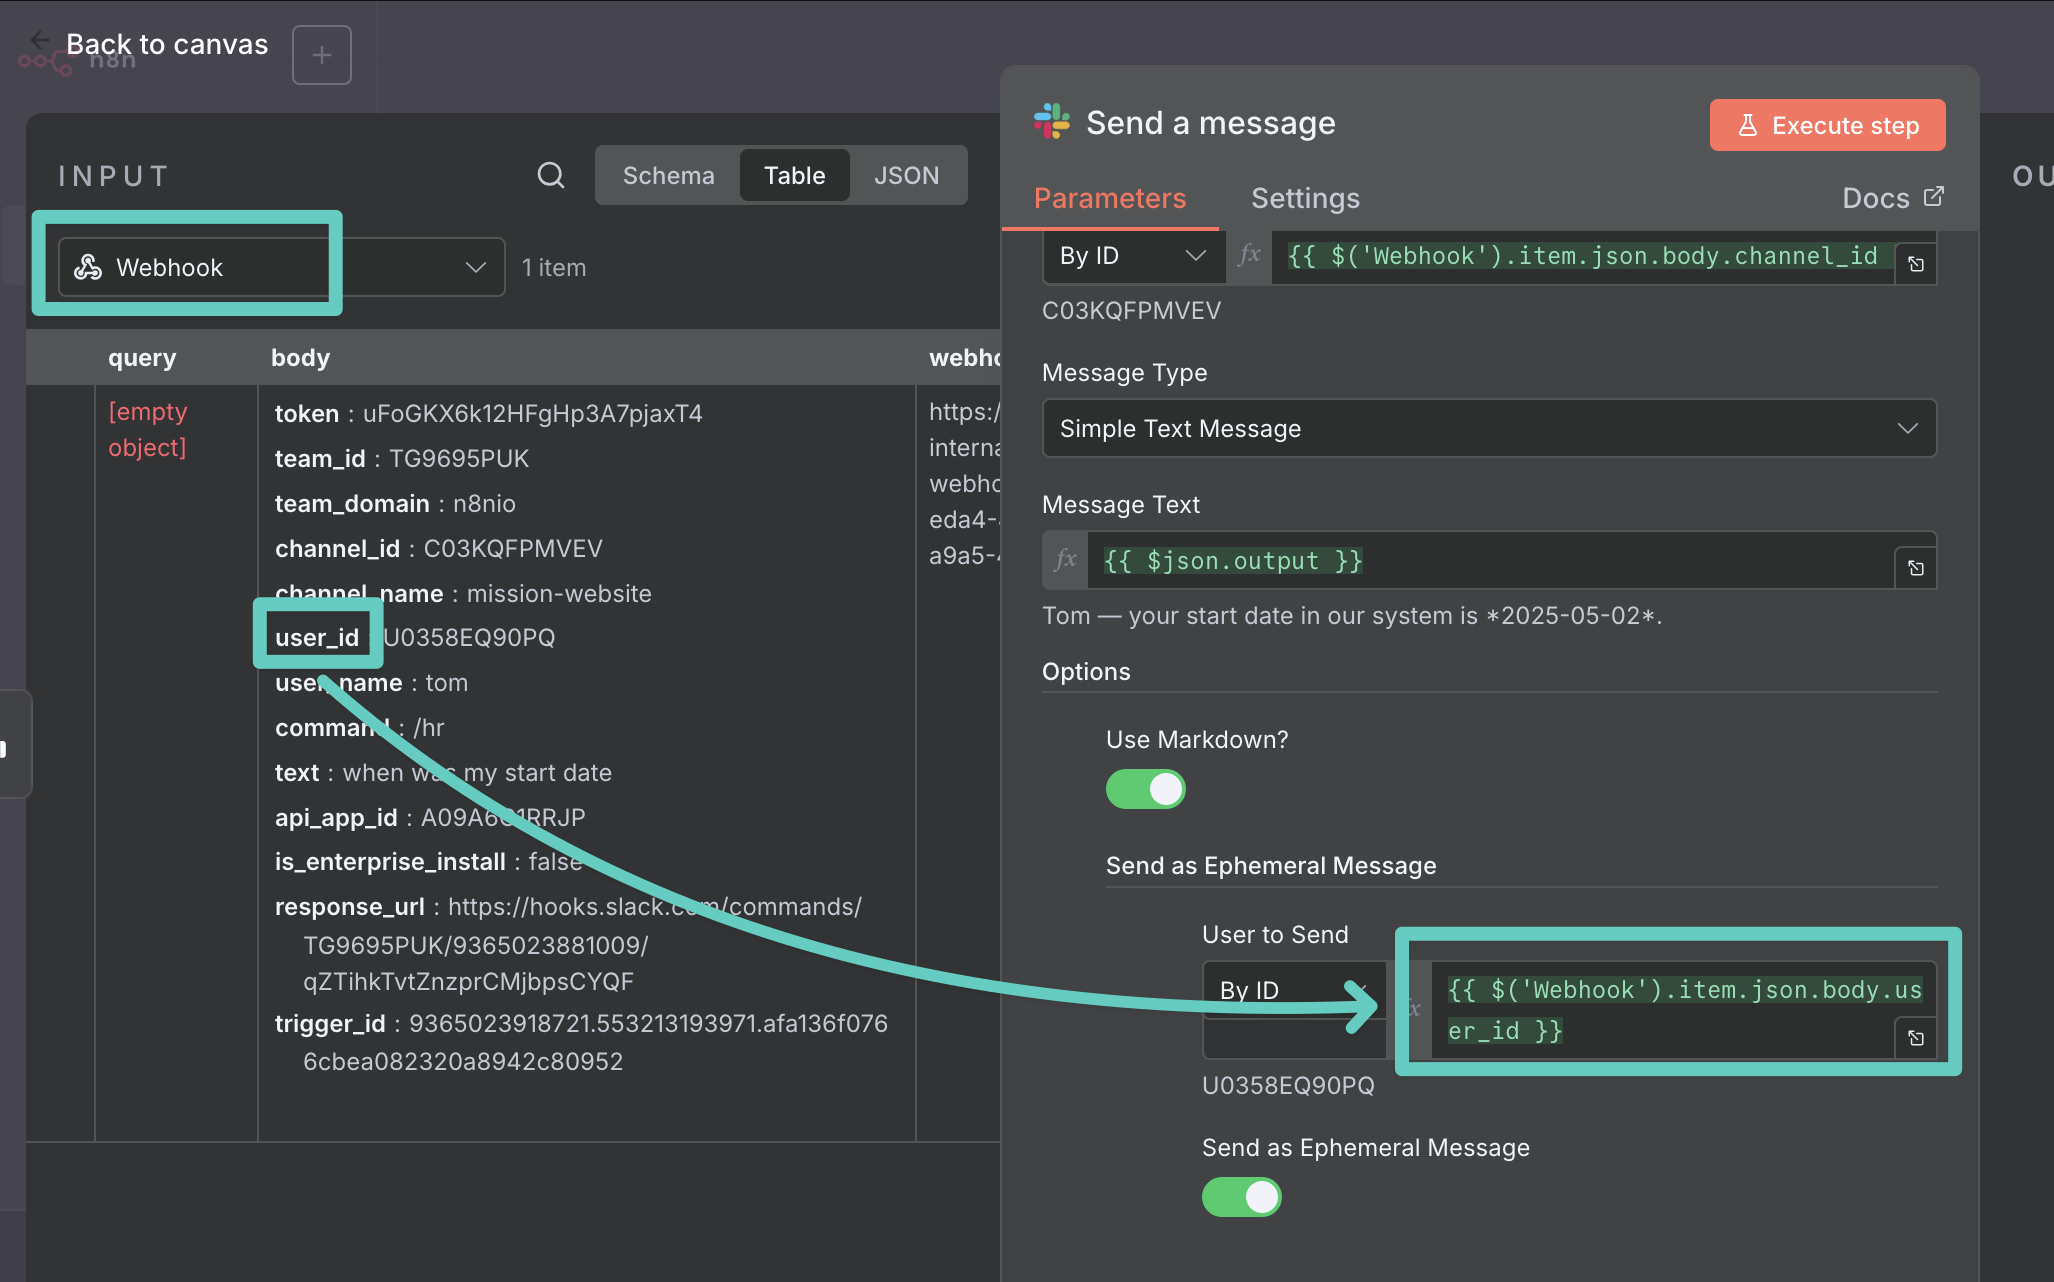
- User to Send: Drag and drop the user_id from the Webhook node in your INPUT panel into this, and make sure Send as Ephemeral Message is enabled
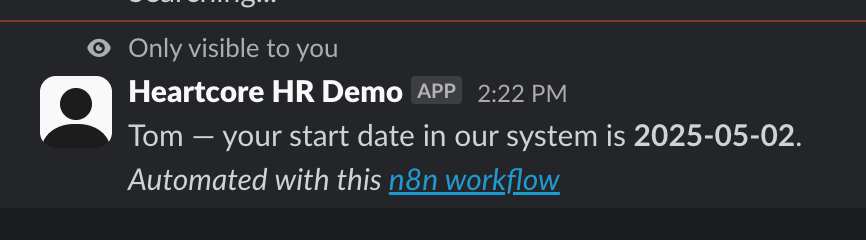
Lastly, click Execute step! Now when checking back on the Slack channel in which you've originally posted your command you should see the response like so:
Okay, one very last thing is still to do here: Head back to the canvas and make sure you hit Save to make sure your work is saved.
And that's it! As long as your workflow is active you now have your personal AI Agent capable of answering questions using HiBob data.
Closing thoughts
This turned out to be a long post. In fact, it's much longer than I expected when I casually suggested that I could write a guide on how to approach this. However, if you're wondering how to add AI functionality to HiBob, it's definitely worth reading. Many of the steps outlined above only ever need to be done once, such as setting up your credentials.
Once you have reached this section you should have a basic understanding of how to automate processes using n8n. So the next workflow you build will already be twice as fast. Build a couple more and you'll be down to only needing a few minutes for each one, I promise! As you've probably realised, you're not just limited to connecting HiBob, OpenAI and Slack.
Lastly, I want to share a few considerations around this specific use case:
- Integrating AI can carry compliance and security risks, especially when working with sensitive data. Be careful who can access your data (imagine employee A accessing information about employee B, or an AI model provider using your HRIS data for training).
- In this example we are using OpenAI, in the real world you want to make sure you're connecting an AI model that has been vetted and follows the relevant rules in your organization and jurisdiction.
- We also fetch only a limited number of fields from HiBob and do not allow our AI model to override this choice. The fields we're fetching from HiBob contain typical information every employee in an organization might have access to. But before actually rolling out a process like this you want to triple-check you're absolutely not including any secret information in here.
- Firstly, only authorised members of our company's internal Slack workspace have access to the command. Again: Before rolling out a process like this, make sure you triple-check who can invoke it.
Workflow
You already know n8n, know how to keep you AI apps safe, and just want the template? Here you go:
Download the file and import it as documented here.